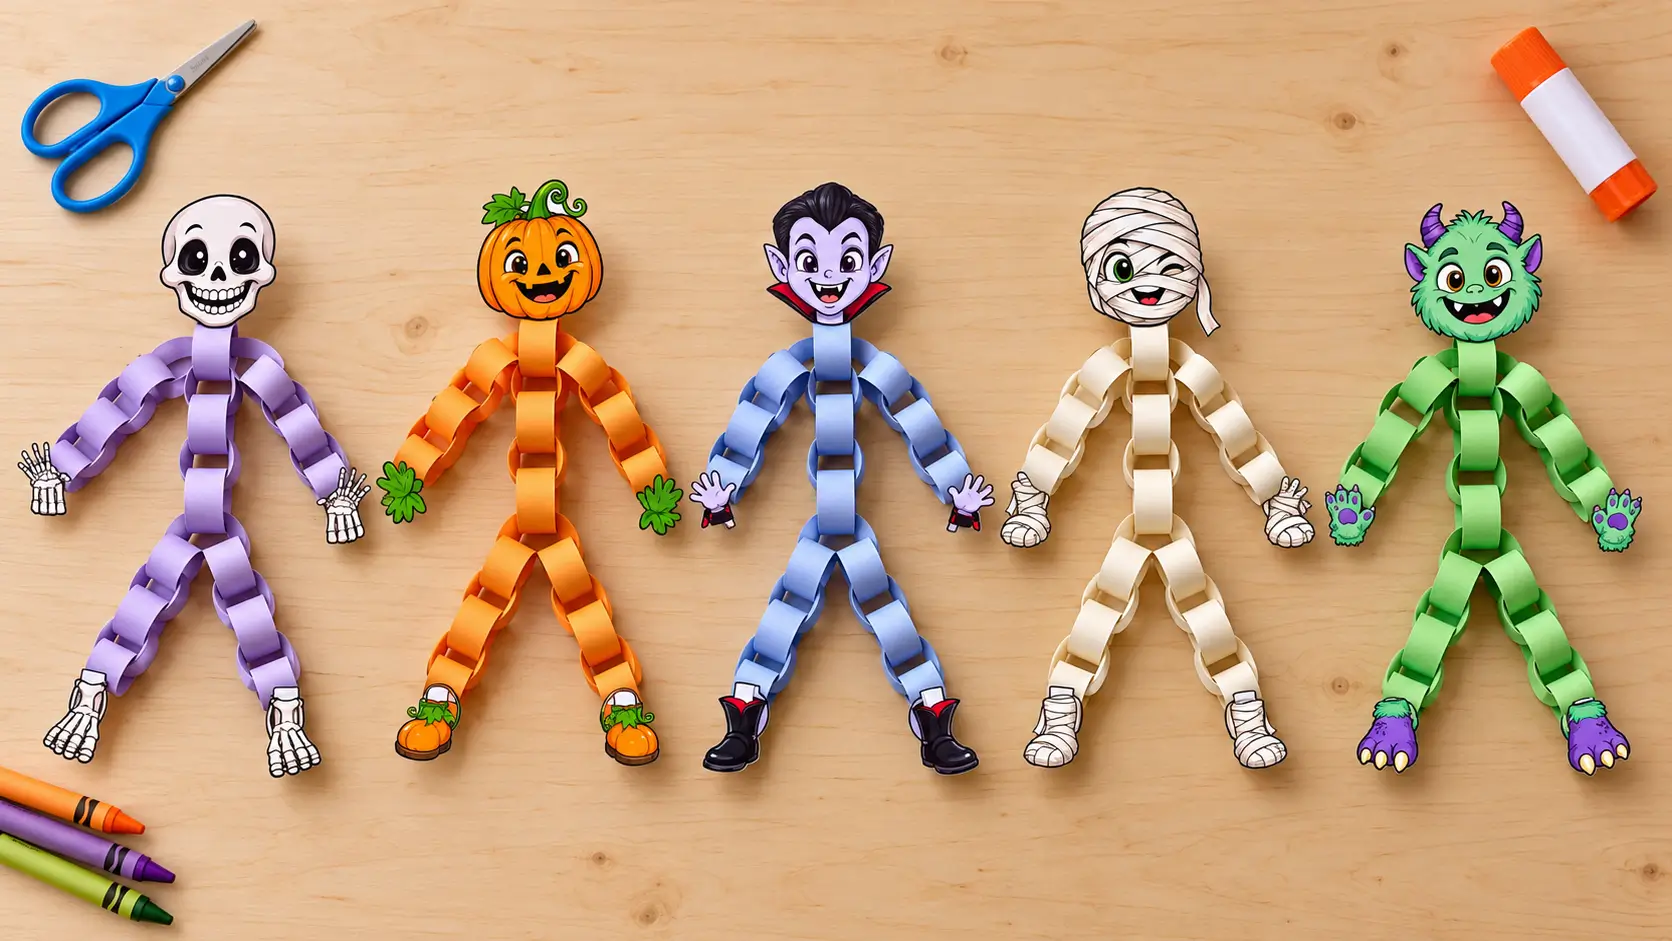
A Halloween paper chain craft turns simple paper strips into a hanging character with moving arms and legs. Children curl the strips into rings, link them together, and add a printed head, hands, and feet to complete their creation.
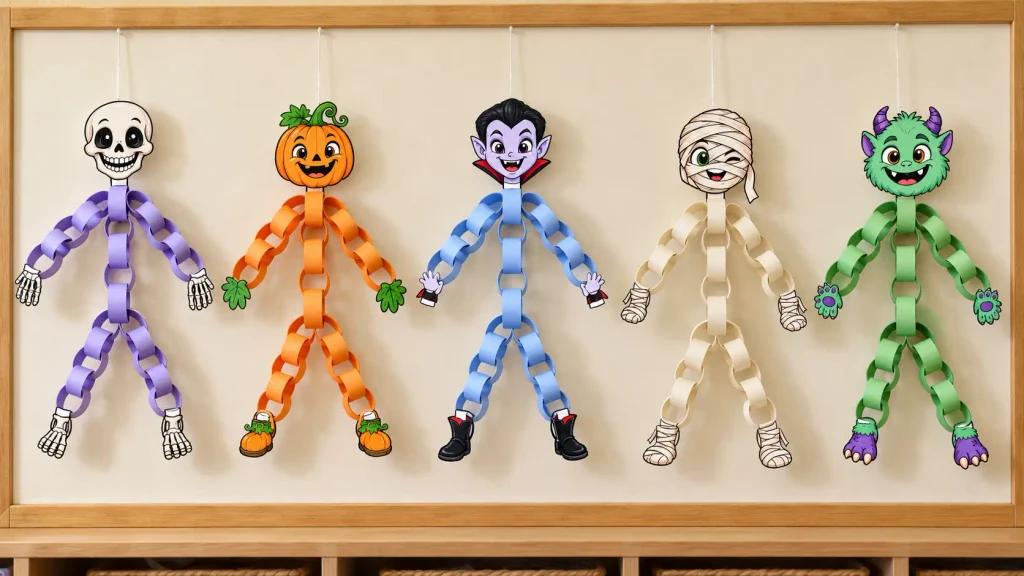
The Happy Haunts printable offers five character choices: a skeleton, a pumpkin, a vampire, a mummy, and a friendly monster. Each one uses the same assembly method, making it easier to offer different designs without teaching five separate projects.
This guide walks you through choosing your pages, preparing the supplies, assembling each character, and using the activity for counting, storytelling, or an indoor classroom display.
Table of Contents
What Is a Halloween Paper Chain Craft?
This Halloween paper chain craft uses connected paper rings to create a figure rather than a long decorative garland. Four rings form the body, while separate chains become the arms and legs.
The character’s head attaches at the top, the hands attach to the ends of the arms, and the feet finish the legs. Because the rings connect loosely, the finished figure can move gently when lifted or hung.
Children take part through coloring, cutting, curling, threading, and gluing. The amount of adult help depends on their experience with scissors and their ability to hold a paper loop while securing the ends.
What Comes in the Happy Haunts Printable?
Happy Haunts contains 31 PDF pages in US Letter portrait format, measuring 8.5 x 11 inches.
The file includes:
- Five different character designs.
- Color and black and white character pieces.
- Color link pages for each character.
- Shared black and white link pages.
- A printing guide and assembly instructions.
You do not need to print all 31 pages. One completed character normally requires four activity pages: one page of character pieces and three pages of paper strips.
Five Halloween Paper Chain Craft Characters to Choose From
These paper chain Halloween characters share the same linked structure. Children can choose their favorite design while everyone follows the same basic instructions.
1. Skeleton
The skeleton includes a smiling skull, skeletal hands, and skeletal feet. Its recognizable pieces make it a clear choice for children interested in a paper chain skeleton craft.
Start with the printed color pieces or let children decorate the black and white version before cutting. The paper rings become the skeleton’s body and limbs, with the printed pieces attached at the ends.
For a classroom display, children could give their skeleton a name and dictate or write a short sentence about it.
2. Pumpkin
The pumpkin character has an orange pumpkin face, green leafy hands, and pumpkin style feet. Its bright colors help it stand out among the other hanging figures.
This Halloween paper chain craft option works well for children who prefer a pumpkin character to a skeleton or vampire. The black and white version also gives them room to choose their own colors.
After assembly, invite children to describe the face, identify the colors they used, or invent a name for their pumpkin friend.
3. Vampire
The vampire features a purple face, dark hair, matching hands, and black boots. The contrast between the face and boots makes the finished character easy to recognize.
Although its appearance differs from the pumpkin and skeleton, the assembly stays the same. Children build the body first, add the arms and legs, and then attach the printed vampire pieces.
A simple storytelling prompt is: “Where is your vampire going tonight?” Children can answer aloud or write one sentence on a separate sheet of paper.
4. Mummy
The mummy has a wrapped head, hands, and feet. These printed details create the character’s appearance without requiring children to wrap individual strips around the finished figure.
The Halloween paper chain craft still uses four body links and five links for each limb. The mummy pieces attach to those links in the same way as the other designs.
Children choosing the coloring version can decide how to decorate the bandages before cutting the pieces.
5. Friendly Monster
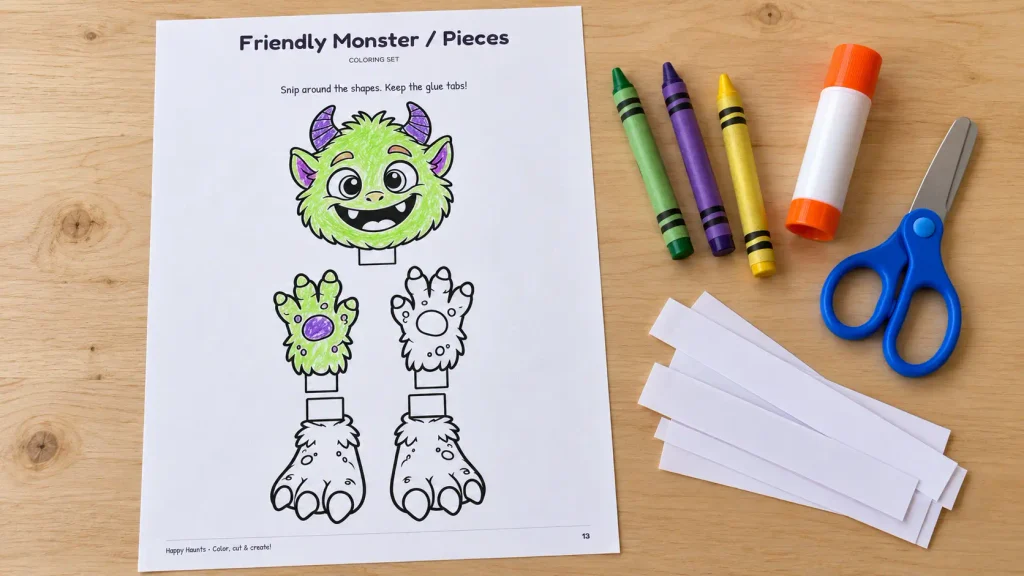
The friendly monster has a green face, purple accents, clawed hands, and matching feet. Its smiling expression offers another choice for children who enjoy imaginary creatures.
The black and white version lets children create their own monster color combinations. They might choose green and purple, or try an entirely different palette.
Once the character is finished, ask children to name it and describe one friendly thing it likes to do.
Supplies for Your Halloween Paper Chain Craft
Gather the materials before printing so children have a clear workspace for cutting and assembling.
You will need:
- A printer.
- Paper or light cardstock.
- Crayons or colored pencils for the coloring version.
- Scissors appropriate for the child’s cutting skills.
- A glue stick.
- A tray or small container for loose pieces.
An adult can also prepare string if you plan to hang the completed character.
Print this Halloween paper chain printable at Actual Size or 100%. Color the pieces while they are flat, and keep the glue tabs when cutting around the character shapes.
Paper is generally easier to curl than thicker materials. If you use light cardstock, check that children can bend the strips into rings and hold the overlap securely.
Which Printable Pages Should You Choose?
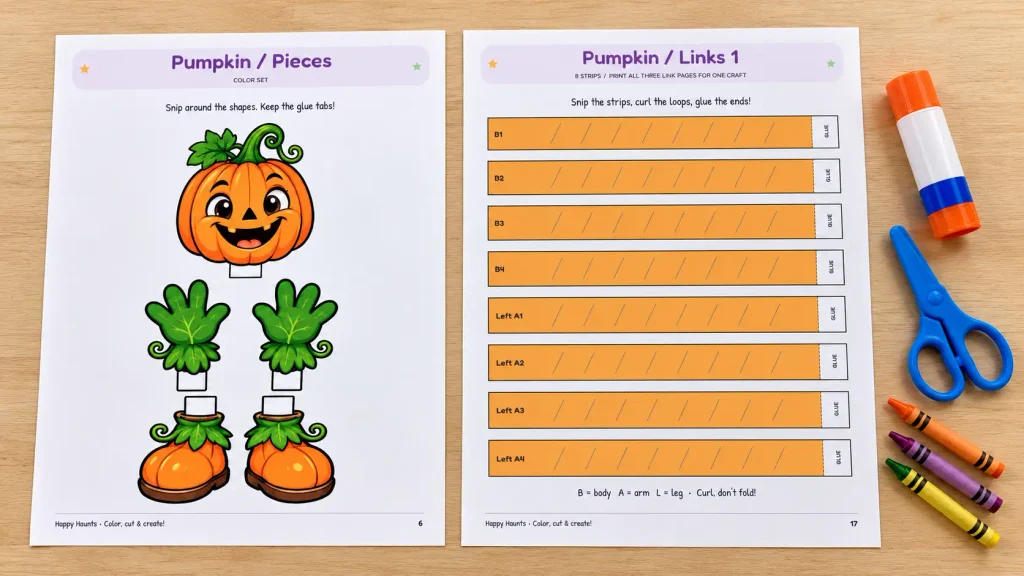
Each Halloween paper chain craft character needs one pieces page and three link pages. Use the table below to select the correct combination.
| Character | Color pieces | Black and white pieces | Color links |
|---|---|---|---|
| Skeleton | Page 4 | Page 5 | Pages 14 to 16 |
| Pumpkin | Page 6 | Page 7 | Pages 17 to 19 |
| Vampire | Page 8 | Page 9 | Pages 20 to 22 |
| Mummy | Page 10 | Page 11 | Pages 23 to 25 |
| Friendly Monster | Page 12 | Page 13 | Pages 26 to 28 |
Pages 29 to 31 contain the shared black and white links for any character.
For example:
- To make a color Skeleton, print pages 4, 14, 15, and 16.
- To make a black and white Skeleton, print pages 5, 29, 30, and 31.
Page 1 is the cover. Page 2 explains printing and preparation, and page 3 provides assembly instructions. You can print the instruction pages separately if you would like a paper reference beside the activity.
For a group, prepare one four page activity set for each child or pair.
How to Make the Halloween Paper Chain Craft
Before starting, look at the labels on the strips. B identifies the body, A identifies the arms, and L identifies the legs.
One character uses four body links, five links for each arm, and five links for each leg.
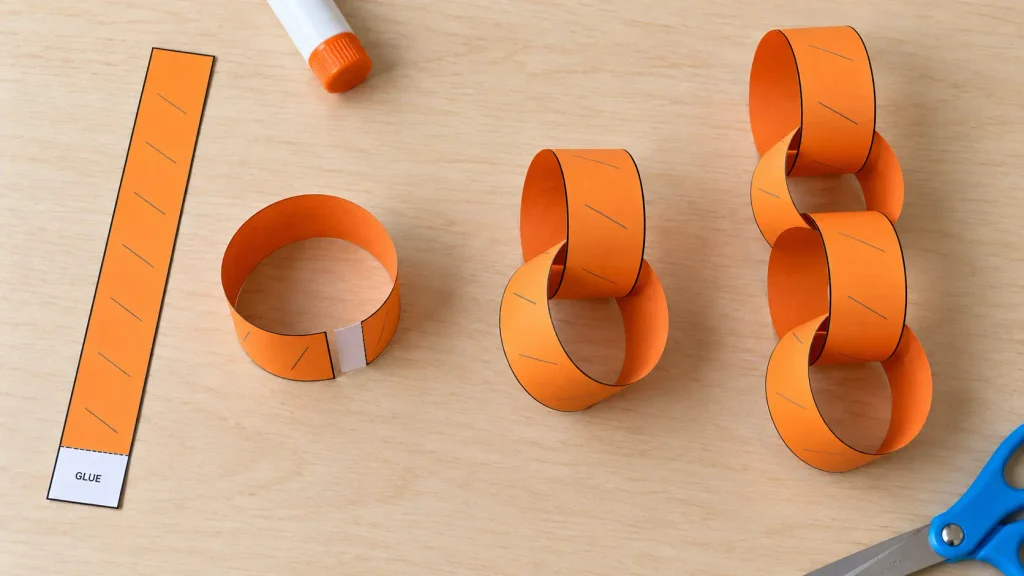
The most important technique is to thread each new strip through the previous ring before gluing it closed. Curl the strips into loops rather than folding them flat.
Step 1: Choose and Print a Character
Choose one of the five designs and decide whether to use the color or black and white version.
Print its pieces page and the correct three link pages. Check the page numbers before starting, especially if several children choose different characters.
Step 2: Color the Flat Pieces
If you are using the black and white version, color the head, hands, feet, and strips before cutting.
Working on flat paper makes coloring easier than trying to decorate a completed chain. Give children time to finish their choices before moving to assembly.
Step 3: Cut and Sort the Pieces
Cut around the character shapes, keeping the glue tabs. Then cut all 24 paper strips.
Sort the strips into five groups:
- Body: B1 to B4.
- Left arm: A1 to A5.
- Right arm: A1 to A5.
- Left leg: L1 to L5.
- Right leg: L1 to L5.
Sorting helps children find the next piece without searching through a pile. An adult can prepare these groups for children who need help.
Step 4: Build the Body
Curl B1 into a ring. Overlap its ends by approximately half an inch at the area marked GLUE, apply glue, and hold the join until secure.
Thread B2 through B1 before closing B2. Then thread B3 through B2, followed by B4 through B3.
You now have the four link body for your Halloween paper chain craft.
Step 5: Add the Arms
Thread the left A1 strip through B1, the top body ring, and close it.
Add A2 through A5 one at a time, threading each new strip through the previous arm ring before gluing.
Repeat on the other side. Both arms connect to B1, and each arm should contain five links.
Step 6: Add the Legs
Thread the left L1 strip through B4, the bottom body ring, and close it.
Continue with L2 through L5. Repeat for the right leg, also beginning at B4.
Count the links on each side before attaching the feet. Both legs should have five.
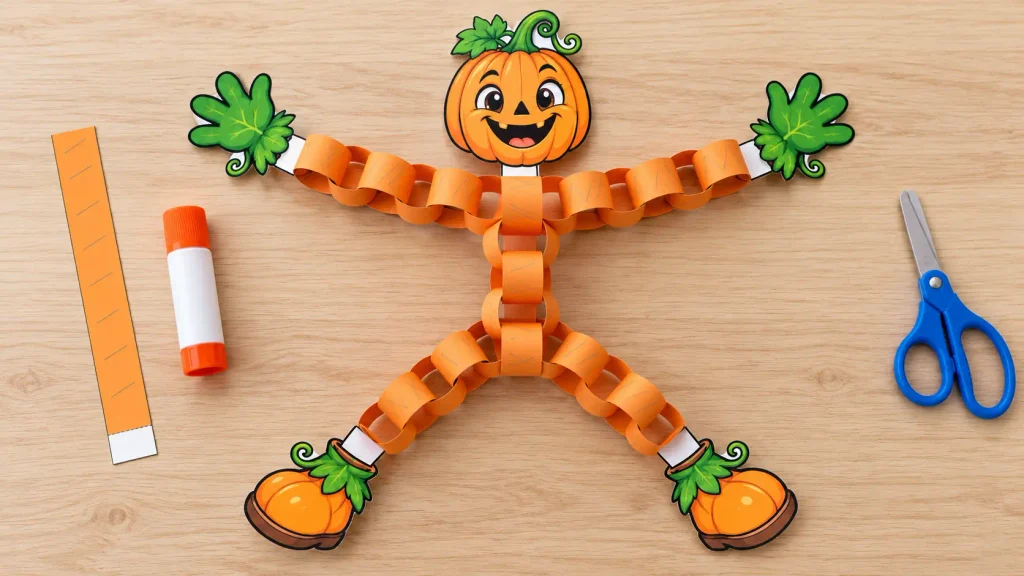
Step 7: Attach the Character Pieces
Glue the head’s neck tab to B1.
Attach one hand to each A5 end link and one foot to each L5 end link. Support the joins while they begin to set.
The printed head, hands, and feet give your Halloween paper chain craft its finished character.
Step 8: Let the Glue Dry
Allow glued joins to set as you work, and let the completed character dry before hanging it.
An adult can thread string through B1 and choose a suitable indoor display spot. Lift the character carefully so the paper joins are not pulled apart.
Learning Activities to Try While Children Build
A Halloween paper chain craft can also become a practical activity for counting, comparing, and explaining a sequence.
The following ideas are optional extensions. They do not require additional worksheets from the printable.
Count and Compare the Links
Start with a small counting task, such as counting the four body rings.
Then count one arm or leg. Invite children to compare the two arms and check whether they have the same number of links.
For children ready to work with a larger total, show how the parts combine:
4 + 5 + 5 + 5 + 5 = 24
Let them point to each part while counting. There is no need to introduce the full sum if they are still practicing smaller numbers.
Practice Sequence Words
Use first, next, and last while demonstrating the Halloween paper chain craft.
For example:
“First, curl the body strip. Next, thread another strip through the ring. Last, add the character pieces.”
After assembly, children can explain one part of the process to a partner or family member.
Add a Short Story or Sentence
Ask children to give their character a name and imagine something it enjoys doing.
Possible sentence starters include:
- My monster likes…
- My pumpkin is going to…
- My skeleton’s name is…
- My mummy can…
- My vampire lives in…
Children can dictate their answer to an adult or write it on a separate piece of paper. Display the sentence beside the character if you wish.
Adapt the Halloween Paper Chain Craft for Different Children
Children may need different levels of support even when they are the same age. Adjust the preparation and assembly to match their skills.
Younger Children
For younger children, an adult can cut the shapes and strips in advance and place each group in a separate tray.
Children can participate by coloring, choosing the next strip, applying glue with support, or pressing an overlap while an adult holds the loop.
Consider dividing the Halloween paper chain craft across two sessions. Use the first for coloring and preparation, and the second for building.
For other ways to practice handling paper and assembling small parts, explore these fine motor activities.
More Independent Children
Children with more cutting and assembly experience can follow the strip labels and check their work as they build.
Encourage them to compare both arms and both legs before attaching the hands and feet. If a limb looks shorter, they can count the rings and look for a skipped label.
Keep the printed instructions nearby so they can refer to the connection points.
Classroom Groups
For a Halloween classroom craft, prepare the selected pages before the activity and give each child or pair a tray.
Demonstrate the body first. Once children understand how to thread and close a loop, show where the arms and legs connect.
Avoid putting every character’s loose pieces in one shared pile. Separate sets make it easier to keep matching heads, hands, feet, and strips together.
Display Your Halloween Paper Chain Craft
The finished figures work as lightweight indoor decorations. Allow the glue to dry completely before arranging them.
Classroom Wall Display
Hang the characters with enough space for their arms and legs. You can group matching designs or arrange all five character types together.
Add a separate name card or a dictated sentence to connect the display with children’s language work.
Doorway or Hallway Display
An adult can position the figures beside a doorway or on a nearby wall, keeping them clear of walkways and places where people might catch the strings.
Choose a location where the paper chains can hang without being pulled or brushed against repeatedly.
Home Craft Display
At home, children can help choose a display spot while an adult handles the hanging.
A Halloween paper chain craft can sit alongside other seasonal artwork. For a different paper activity to add to the display, try these fall handprint crafts for kids.
Keep the finished figures indoors and away from moisture.
Troubleshooting Your Halloween Paper Chain Craft
Small assembly problems are easier to fix before hanging the character. Check the joins and count the limbs while the project is still on the table.
The Paper Links Keep Opening
Check that the strip ends overlap at the GLUE area by approximately half an inch.
Apply glue to the overlap and hold the ends together until secure. Avoid pulling on a newly glued ring while adding the next one.
One Arm or Leg Looks Shorter
Count the rings and compare their labels.
Each arm should run from A1 through A5, and each leg should run from L1 through L5. Look for a skipped strip before attaching the hand or foot.
A Strip Was Folded Flat
Gently curve it back into a loop. If the crease prevents it from holding its shape, reprint the relevant link page and replace the strip.
Keep the strips unlaminated so they remain easier to curl and glue.
The Head, Hands, or Feet Come Loose
Check that the glue tabs were kept during cutting.
Apply glue at the attachment point and support the piece while the join sets. If a tab was accidentally removed, you can reprint the character pieces page.
Some Links Are Missing
Check that all three link pages were printed and that no strips remain on an uncut sheet.
Each link page contains eight strips. One or two link pages will not provide a complete character.
Get the Halloween Paper Chain Printable
Happy Haunts is a printable I created and sell through my Etsy shop, ArtColorBooKids.
If you would like to make the five characters shown in this guide, you can find the Happy Haunts Halloween paper chain craft printable on Etsy.
Choose the color version for cutting and assembly, or select the black and white version so children can decorate their character first.
Frequently Asked Questions
How Many Pages Do I Print for One Character?
Print four activity pages: one character pieces page and three link pages. You can print the preparation and assembly instructions separately if needed.
Are Color and Black and White Versions Included?
Yes. All five characters have color and black and white pieces. The file also includes character specific color links and shared black and white links.
How Many Paper Links Does One Character Need?
Each character uses 24 paper links. Print all three link pages to get the complete set.
Can Preschoolers Make This Halloween Paper Chain Craft?
Preschoolers can participate with adult support. They may enjoy coloring and helping with the loops, while an adult prepares the pieces and assists with cutting, threading, and gluing.
How Do I Hang the Finished Character?
Let the glued joins dry first. An adult can then thread string through B1 and hang the character in a suitable indoor spot away from walkways.
Choose Your Character and Start Creating
Pick a character, print its four activity pages, and prepare a tray for the pieces. Take the assembly one section at a time, beginning with the body.
Once children understand how to connect the loops, they can use the same method to make another Halloween paper chain craft with a different character.