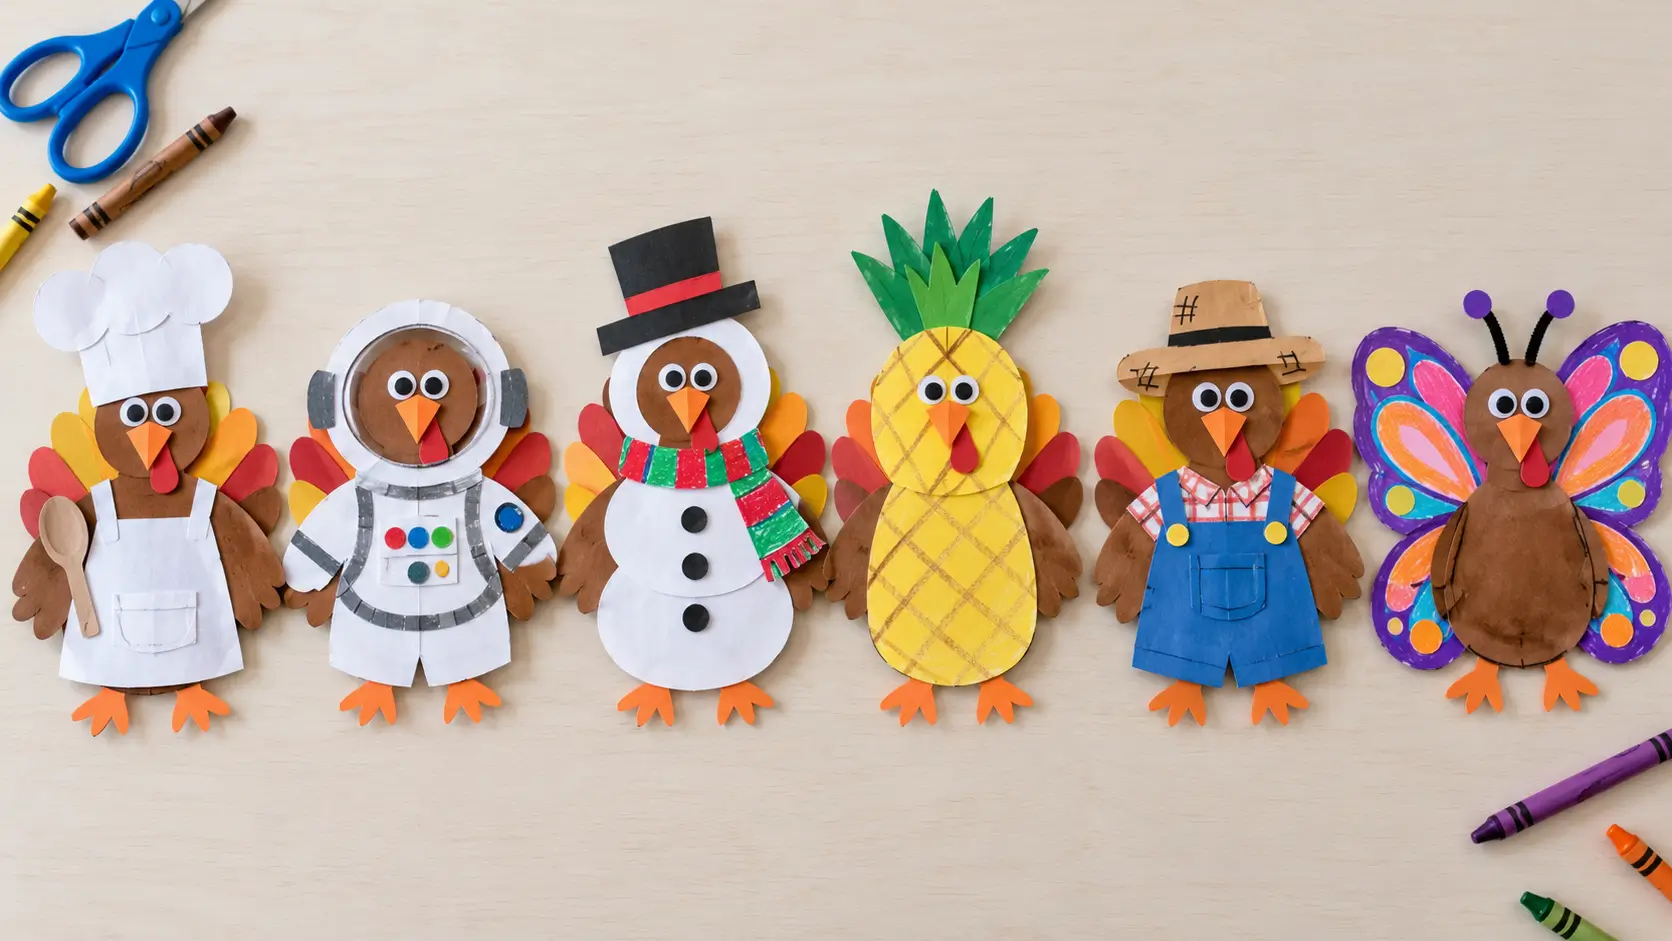
A turkey disguise project starts with a simple turkey picture and ends with a turkey that looks like someone or something else. Children color, cut, and glue paper pieces to turn their turkey into an astronaut, a chef, a snowman, or even a pineapple. These turkey disguise ideas use ordinary paper supplies, so you can begin with materials you already have.
This guide includes 12 disguises, each with specific supplies, assembly steps, an easier option, and a storytelling prompt. Choose a project for a family afternoon, a kindergarten activity, or a first grade writing lesson.
Children do not need to produce identical results. A crooked hat, an unexpected color, or a costume with extra pockets can become part of the turkey’s story.
Table of Contents
What Is a Turkey in Disguise Project?
A turkey in disguise project is a paper craft with an imaginary story attached. In one familiar version, the turkey dresses up so it will not be recognized before Thanksgiving dinner.
If you prefer a different introduction, try: “Help your turkey dress up for a costume parade.” Children make the same costumes while imagining where their characters will go and what they will do.
The disguise can be as simple as a colored hat or as detailed as a paper suit with matching accessories. Children can draw directly on their turkey, add flat paper pieces, or combine both approaches.
A purchased kit is optional. Use a turkey outline you already have or draw one using the instructions below.
Choose Your Turkey Disguise Idea
Compare these turkey disguise ideas before gathering supplies. The amount of adult help needed depends on each child’s cutting skills and the materials you choose.
Astronaut: Gray or white paper, a helmet frame, and a drawn control panel. Adults can prepare the helmet opening.
Chef: A white paper hat and a colorful apron. This is a manageable option with a few large pieces.
Robot: Gray paper rectangles and drawn buttons. Children can add their own controls.
Farmer: A wide paper hat and blue overalls. Most pieces use simple shapes.
Scuba diver: A mask, snorkel, and flippers on blue backing paper. The mask opening needs careful cutting.
Detective: A hat, coat, and paper magnifying glass. Adults can prepare the small accessories.
Painter: A beret, apron, and colorful palette. Crayon marks can replace small paper decorations.
Gardener: A sun hat and an apron with a garden pocket.
Snowman: White circles, a paper hat, and a colorful scarf.
Ice cream cone: A tan cone and overlapping paper scoops.
Pineapple: A yellow oval with a diamond pattern and green leaves.
Butterfly: Matching paper wings decorated with crayon patterns.
For an easy starting point, choose the chef or farmer. Children who enjoy adding details may prefer the robot, painter, or detective.
Supplies and Preparation
Most of these turkey disguise ideas use the same basic materials: a turkey outline, printer paper or lightweight cardstock, crayons, colored pencils, colored paper, child scissors, and a glue stick.
Keep clean scrap paper nearby for costume pieces. A larger backing sheet is useful when wings, hats, or accessories extend beyond the turkey.
White paper colored with crayons can replace colored construction paper. Children can also draw costume details instead of cutting tiny decorations.
Adults should supervise scissor use and prepare any detailed cuts that are beyond a child’s current skills.
How to Draw a Simple Turkey
You can create a starting outline in a few steps:
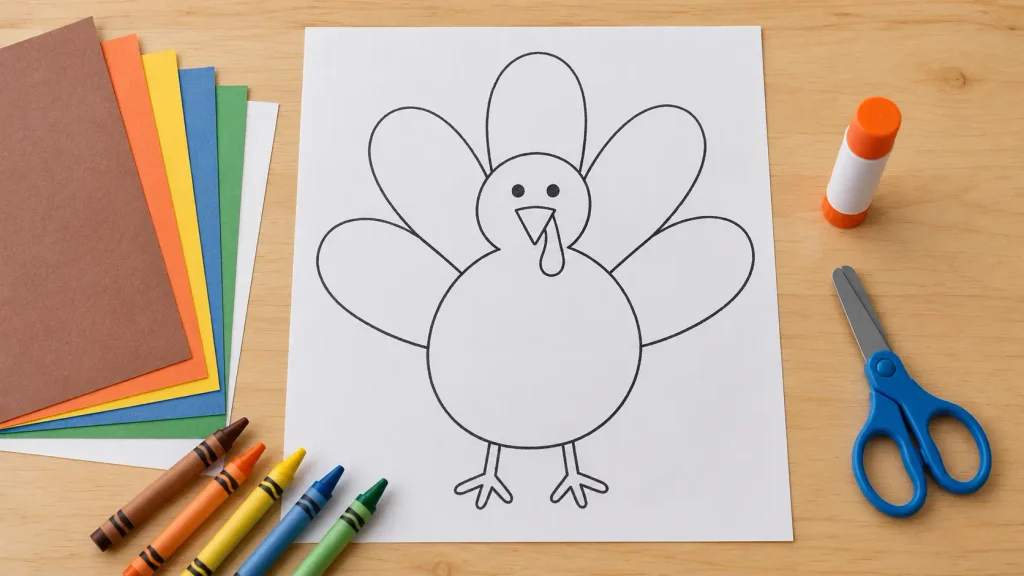
- Lightly draw a large fan shape for the tail.
- Draw an oval body in front of the lower middle of the fan.
- Add a small round head above the body.
- Add a beak, eyes, and two feet.
- Trace the lines you want to keep and erase overlapping construction lines.
Leave space around the turkey for hats, wings, and accessories. If children want their turkey to hold something, add simple wings at the sides of its body.
The drawing does not need to be perfect. Children can adjust costume pieces to fit their own outlines.
Prepare Before Gluing
Color the parts of the turkey that will remain visible before adding costume pieces. Then cut out the larger shapes and arrange everything without glue.
Check that hats fit around the head and that clothing leaves enough room for the face. For costumes that cover the original face, children can draw a new one on the paper covering.
Use a backing sheet when pieces extend beyond the outline. Glue background accessories first and place the turkey over them afterward.
For additional paper activities, explore these fine motor skills worksheets.
12 Creative Turkey Disguise Ideas
These turkey disguise ideas use flat paper construction. Each costume can be simplified by drawing details instead of cutting them separately.
1. Astronaut Turkey
Finished look: A turkey wearing a gray or white suit, with a round helmet frame around its face and controls on its chest.
Materials: Gray or white paper, light blue paper, crayons, and a marker.
- Cut a rectangle slightly smaller than the turkey’s body. Round the corners and position it below the head as a space suit.
- Cut a paper circle larger than the turkey’s head. Have an adult cut an opening in the middle, leaving a frame wide enough to surround the face.
- Position the helmet frame so the turkey’s eyes and beak remain visible. Glue the frame and suit into place.
- Cut a curved strip of light blue paper and add it to the helmet frame as a reflection detail.
- Draw buttons, a control panel, and an original mission badge on the suit.
If the helmet extends beyond the head, mount the project on backing paper.
Easier version: Draw the helmet outline around the face and add only the paper suit.
Story prompt: “My astronaut turkey lands on…”
2. Chef Turkey
Finished look: A turkey wearing a tall white chef hat and a colorful apron.
Materials: White paper, colored paper, and a marker.
- Cut a white rectangle about as wide as the turkey’s head for the hat band.
- Cut a wider cloud shape for the puffy top. Glue its lower edge behind the band.
- Attach the finished hat above the turkey’s face, overlapping the head slightly.
- Cut an apron from colored paper. Trim the upper corners inward and glue it over the body.
- Draw a pocket and a spoon or whisk on the apron.
Children can add a restaurant name or decorate the apron with their own pattern.
Easier version: Glue on the hat and color the apron directly onto the turkey.
Story prompt: “My chef turkey’s favorite meal to cook is…”
3. Robot Turkey
Finished look: A boxy turkey with a square head, rectangular body, and drawn controls.
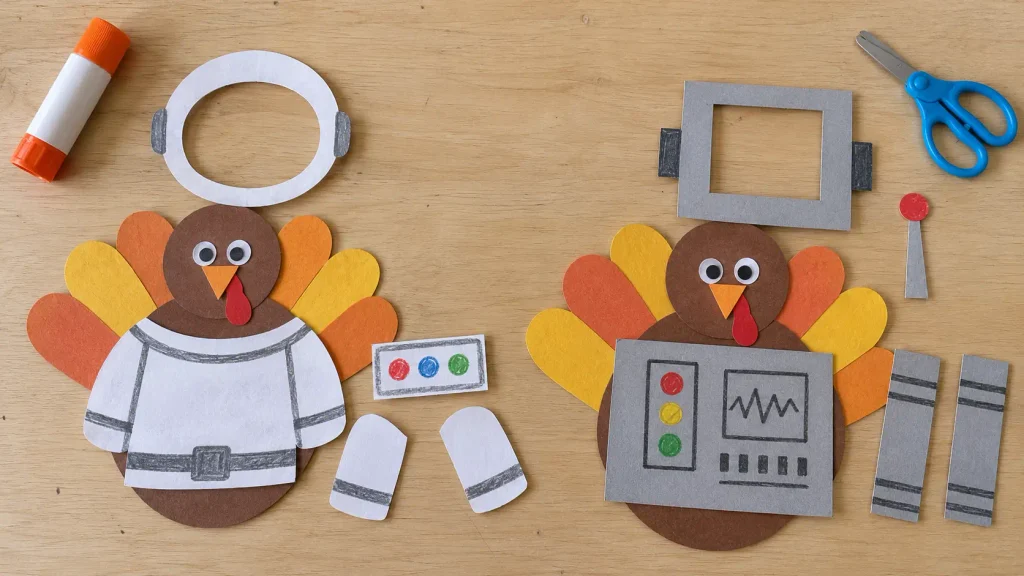
Materials: Gray paper, paper strips, and a marker. A small piece of clean foil is optional.
- Cut a gray rectangle to cover the turkey’s body.
- Cut a smaller square to cover the head. Draw a new robot face with square eyes and a triangular beak.
- Attach short paper strips behind the head square as antennae.
- Glue longer strips behind the sides of the body rectangle for robot arms.
- Draw dials, buttons, and a control panel. Attach the completed costume pieces to the turkey.
The original tail can stay visible behind the robot body. Children may color it gray or add drawn circuit patterns.
Easier version: Use one large gray paper shape and draw the face, arms, and controls.
Story prompt: “When I press the green button, my robot turkey…”
4. Farmer Turkey
Finished look: A turkey wearing a wide hat and blue overalls.
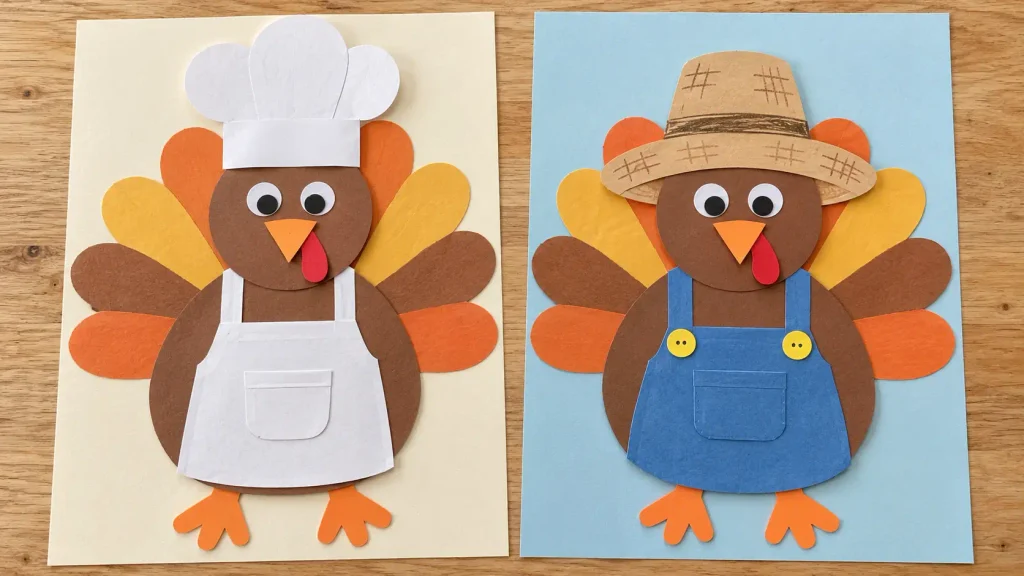
Materials: Tan or yellow paper, blue paper, and a marker.
- Cut a wide oval for the hat brim and a smaller dome for the top.
- Glue the dome behind the brim, then attach the hat above the turkey’s face.
- Cut a blue shape with a rectangular bib and two short legs for the overalls.
- Add two blue paper straps between the bib and the upper body.
- Draw a pocket, buttons, and stitched edges before gluing the overalls into place.
Keep the costume clear of the turkey’s eyes and beak.
Easier version: Color blue overalls onto the body and add only the paper hat.
Story prompt: “The first job on my farmer turkey’s farm is…”
5. Scuba Diver Turkey
Finished look: A turkey on a blue background with a diving mask, snorkel, and paper flippers.
Materials: Blue backing paper, dark paper, another paper color for flippers, and a marker.
- Glue the turkey onto blue backing paper, leaving room above its head and below its feet.
- Cut a dark oval and have an adult remove the middle to make a mask frame. Glue it around the turkey’s eyes.
- Cut a snorkel shaped like the letter J, or join two wide paper strips into an L shape. Glue it beside the mask, with the upper end extending above the head.
- Cut two flippers that widen toward the ends. Glue them over the turkey’s feet.
- Draw bubbles and underwater details on the backing.
All accessories belong on the paper turkey artwork.
Easier version: Draw the mask and flippers, then add one paper snorkel.
Story prompt: “Under the water, my scuba diver turkey discovers…”
6. Detective Turkey
Finished look: A turkey wearing a detective’s hat and coat, with a paper magnifying glass beside one wing.
Materials: Tan or brown paper, backing paper, and a marker.
- Cut an oval brim and a rounded rectangular top for the hat. Glue them together and add a drawn hat band.
- Cut a coat shape to cover the body. Add two small paper triangles or drawn lines for the collar.
- Glue the coat and hat onto the turkey, leaving its face visible.
- Make a magnifying glass from a paper ring and a rectangular handle. An adult can prepare the opening.
- Mount the turkey on backing paper and attach the magnifying glass beside a wing. Draw a trail of footprints nearby.
Children can add a paper notebook if they want another detail.
Easier version: Draw the magnifying glass and coat details instead of cutting them.
Story prompt: “My detective turkey finds a clue beside…”
7. Painter Turkey
Finished look: A turkey wearing a beret and a decorated apron, with a colorful paper palette.
Materials: Dark paper, colored paper, brown paper, and crayons.
- Cut a flattened oval from dark paper for the beret. Add a small drawn stem at the top.
- Glue the beret above the face, tilted slightly to one side.
- Cut an apron from colored paper and attach it over the turkey’s body.
- Cut a bean shape from brown paper for the palette and glue it near one wing.
- Add crayon color spots to the palette and apron.
A short paper strip with a colored tip can become a paintbrush.
Easier version: Make the palette and draw the beret directly onto the turkey.
Story prompt: “My painter turkey is making a picture of…”
8. Gardener Turkey
Finished look: A turkey wearing a sun hat and an apron with flowers or vegetables peeking from a pocket.
Materials: Green or yellow paper, another color for the apron, and a marker.
- Cut an oval hat brim and a smaller semicircle for the top.
- Glue the hat pieces together and attach them above the turkey’s face.
- Cut an apron and glue it over the body.
- Draw flowers, carrots, or tomatoes on the upper part of the apron.
- Glue a small rectangular pocket over the lower edges of those drawings so the plants appear to peek out.
Children can draw a watering can beside the turkey on backing paper.
Easier version: Add the hat and draw the garden details directly onto the body.
Story prompt: “In my gardener turkey’s garden, you can find…”
9. Snowman Turkey
Finished look: A turkey hidden behind stacked white circles, with a colorful scarf and paper hat.
Materials: White paper, colored paper, an orange paper triangle, and colored backing paper.
- Cut three white circles in different sizes.
- Arrange the largest over the lower body, the middle circle above it, and the smallest over the original head. Overlap the circles slightly.
- Glue the circles in place, keeping some tail feathers visible behind them.
- Add a paper hat and a scarf made from one horizontal strip and one shorter strip hanging down.
- Draw eyes and buttons, then attach the orange triangle as a nose.
Colored backing helps the white snowman shape stand out.
Easier version: Use one large white oval for the body and one circle for the head.
Story prompt: “When the weather gets warm, my snowman turkey…”
10. Ice Cream Cone Turkey
Finished look: A turkey with a waffle cone over its lower body and colorful scoops covering much of its tail.
Materials: Tan paper, several colors of paper, and a marker.
- Cut a tan triangle wide enough to cover the lower body. Position the point downward.
- Draw crossing diagonal lines to make a waffle pattern.
- Cut three or four rounded scoop shapes from different paper colors.
- Arrange the scoops over the tail, keeping the turkey’s face visible near the top of the cone.
- Glue the scoops first, then overlap the cone across their lower edges. Draw sprinkles with marker dots.
Use backing paper if the scoop arrangement spreads beyond the original outline.
Easier version: Make one large scoop and one cone.
Story prompt: “My ice cream turkey has a surprising flavor called…”
11. Pineapple Turkey
Finished look: A turkey covered by a yellow pineapple shape, with pointed green leaves above its head.
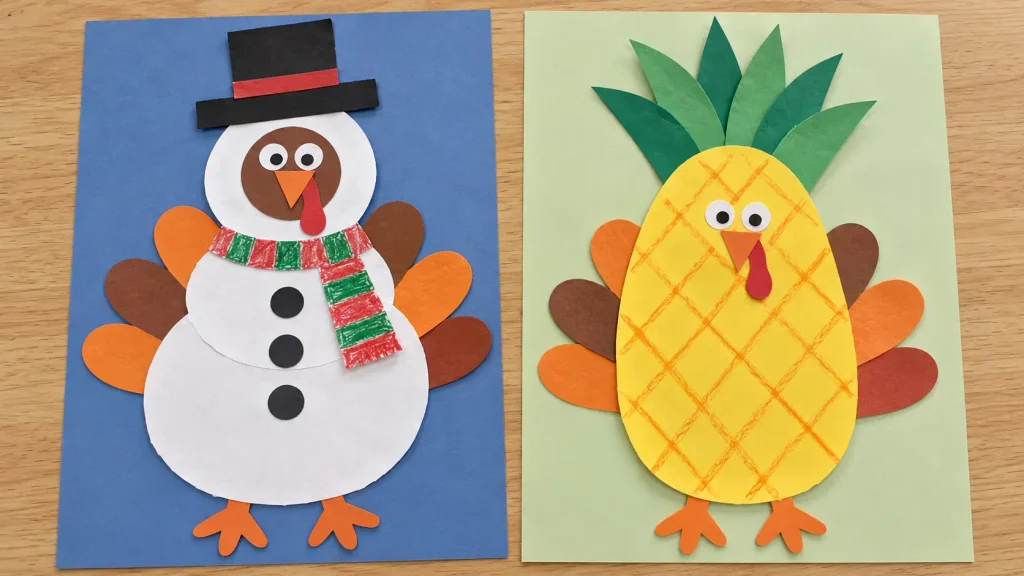
Materials: Yellow paper, green paper, backing paper, and a marker.
- Place the turkey on backing paper, leaving space above the head.
- Cut a yellow oval large enough to cover its body and head. Draw diagonal lines in both directions to make a diamond pattern.
- Cut several broad, pointed green leaves.
- Arrange the leaves behind the top of the yellow oval. Glue the leaves first, then glue the oval over their lower ends.
- Attach the costume over the turkey and draw a new face on the pineapple. Let some tail feathers show around the sides.
Draw the pattern before attaching the oval if children find it easier to work on a separate piece.
Easier version: Color the turkey yellow, draw a diamond pattern, and add three broad leaves.
Story prompt: “My pineapple turkey’s hiding place is…”
12. Butterfly Turkey
Finished look: A turkey with matching colorful wings behind its body and drawn antennae above its face.
Materials: Bright paper, backing paper, crayons, and a marker.
- Fold colored paper in half. Draw one butterfly wing extending outward from the fold. Cut around its outside edge while leaving the fold connected, then open the paper.
- Decorate the wings with crayon patterns or large paper shapes.
- Place the wings on the backing sheet and position the turkey over their center. Adjust the pieces before gluing.
- Glue the wings to the backing first, then glue the turkey’s body over the middle of the wings.
- Draw two antennae above the turkey’s head on the backing paper.
If the original tail hides too much of the butterfly shape, use a separate turkey head and body cutout over the wings.
Easier version: Cut two large oval wings separately and place one on each side.
Story prompt: “My butterfly turkey flies toward…”
Adapt the Project for Preschool, Kindergarten, and First Grade
The same turkey disguise ideas can work at different levels when you adjust the number of pieces and the amount of adult preparation.
Preschool
For turkey disguise ideas for preschool, prepare detailed cuts before the activity. Offer a few large shapes and let children choose colors, arrange pieces, and help with gluing.
Children can describe their turkey while an adult writes down one sentence. A coloring only costume is also an option.
Kindergarten
Turkey disguise ideas for kindergarten can include cutting circles, rectangles, and broad strips. Adults can prepare open helmet frames, small accessories, and other detailed shapes.
Invite children to complete a sentence starter or label one costume part.
First Grade
Children can plan a disguise, label several parts, or write two or three connected sentences about their character.
They might explain why they chose a costume or describe what happens at the turkey’s imaginary parade.
These are flexible suggestions. Some children will want to write more, while others will prefer speaking or drawing.
Add a Turkey Disguise Writing Activity
A short writing activity gives children a way to explain the costume they created. Use these prompts on a board or copy one onto ordinary lined paper:
- My turkey is disguised as…
- You can recognize the costume by…
- My turkey needs…
- My turkey’s new name is…
- At the costume parade, my turkey…
Example: “My turkey is disguised as a chef. You can recognize the costume by the tall white hat. My turkey needs a bigger spoon.”
Children can answer one prompt, combine several, or tell their story aloud. The prompts are suggestions to use with your own paper rather than a separate downloadable worksheet.
For another seasonal conversation, ask children to name something they appreciate about the people who helped them. These gratitude activities for kids offer ways to continue that discussion.
Optional Christian Extension
For Christian homeschool or Sunday school families, my Christian Gratitude Journal for Kids offers a separate activity for writing, drawing, and prayer about thankfulness.
You might use a selected page after the craft to help children reflect on something they appreciate. For more seasonal projects, explore these Thanksgiving Bible crafts for kids.
Organizing the Project at Home or School
A little preparation helps children work with fewer interruptions. Choose a manageable selection of turkey disguise ideas and demonstrate one attachment before everyone begins.
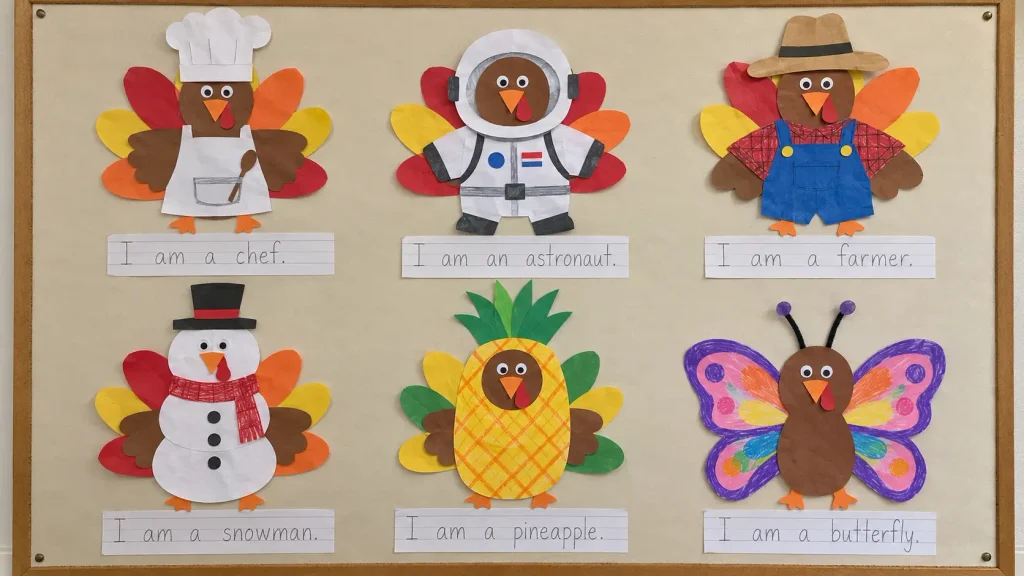
Set out supply trays. Keep crayons, glue sticks, and scissors together for each table.
Use envelopes for loose pieces. Label one for each child so costume parts stay together.
Offer a few starting choices. Children can select from three or four examples or suggest their own.
Keep paper alternatives available. Drawn details can replace small accessories.
Provide time at school. Children who cannot complete a family project at home should have access to materials and help in class.
Support children’s decisions. Help with difficult cuts while allowing children to choose colors and arrangements.
Display different results together. Focus on children’s ideas rather than the cost or quantity of materials.
Let glued projects dry flat before moving them to a display.
Suggested Instructions for Families
You can adapt this wording for a classroom message:
This week, your child is making a turkey in disguise. Invite them to choose a costume and create it with paper, crayons, scissors, and glue. Please help with difficult cutting while allowing your child to make the design choices. Materials you already have are welcome. If completing the project at home is difficult, please let us know so your child can work on it at school.
An Option for Younger Siblings
If you have already printed and prepared a few activities, my Toddler Busy Book Printable offers matching, sorting, and counting options for a younger sibling.
Choose suitable pieces and supervise their use. It is a separate early learning resource from my ArtColorBooKids shop, rather than a Thanksgiving or turkey disguise pack.
Frequently Asked Questions
How Do You Disguise a Turkey With Paper?
Start with a turkey outline, then add paper clothing, accessories, or shapes over its body and tail. Arrange everything before gluing and use backing paper for pieces that extend beyond the outline.
What Are Easy Turkey Disguise Ideas for Preschool?
A chef, farmer, or gardener can be made with a hat and a few large paper pieces. Adults can prepare the cuts while children color, position, and glue.
Do I Need a Printable Template?
No. These turkey disguise ideas can begin with a turkey drawing made from an oval body, round head, fan tail, and feet. An outline you already have works too.
Can We Use Supplies We Already Have?
Yes. Paper, crayons, scissors, and a glue stick are enough. Children can color white paper to make costume pieces and draw details instead of adding separate decorations.
How Can Kindergarten Children Add Writing?
Offer one sentence starter, such as “My turkey is disguised as…” Children can finish it independently, dictate their answer, or label a few costume parts.
Can the Whole Project Be Completed at School?
Yes. You can divide it into planning, coloring, assembly, and writing sessions. Keep unfinished pieces in labeled envelopes between activities.
Ready to Start?
Choose one of these turkey disguise ideas, gather a few sheets of paper, and give children room to make their own decisions. Start with a simple hat or apron if the full costume feels too complicated. The finished turkey and the story behind it can be as individual as the child who created them.