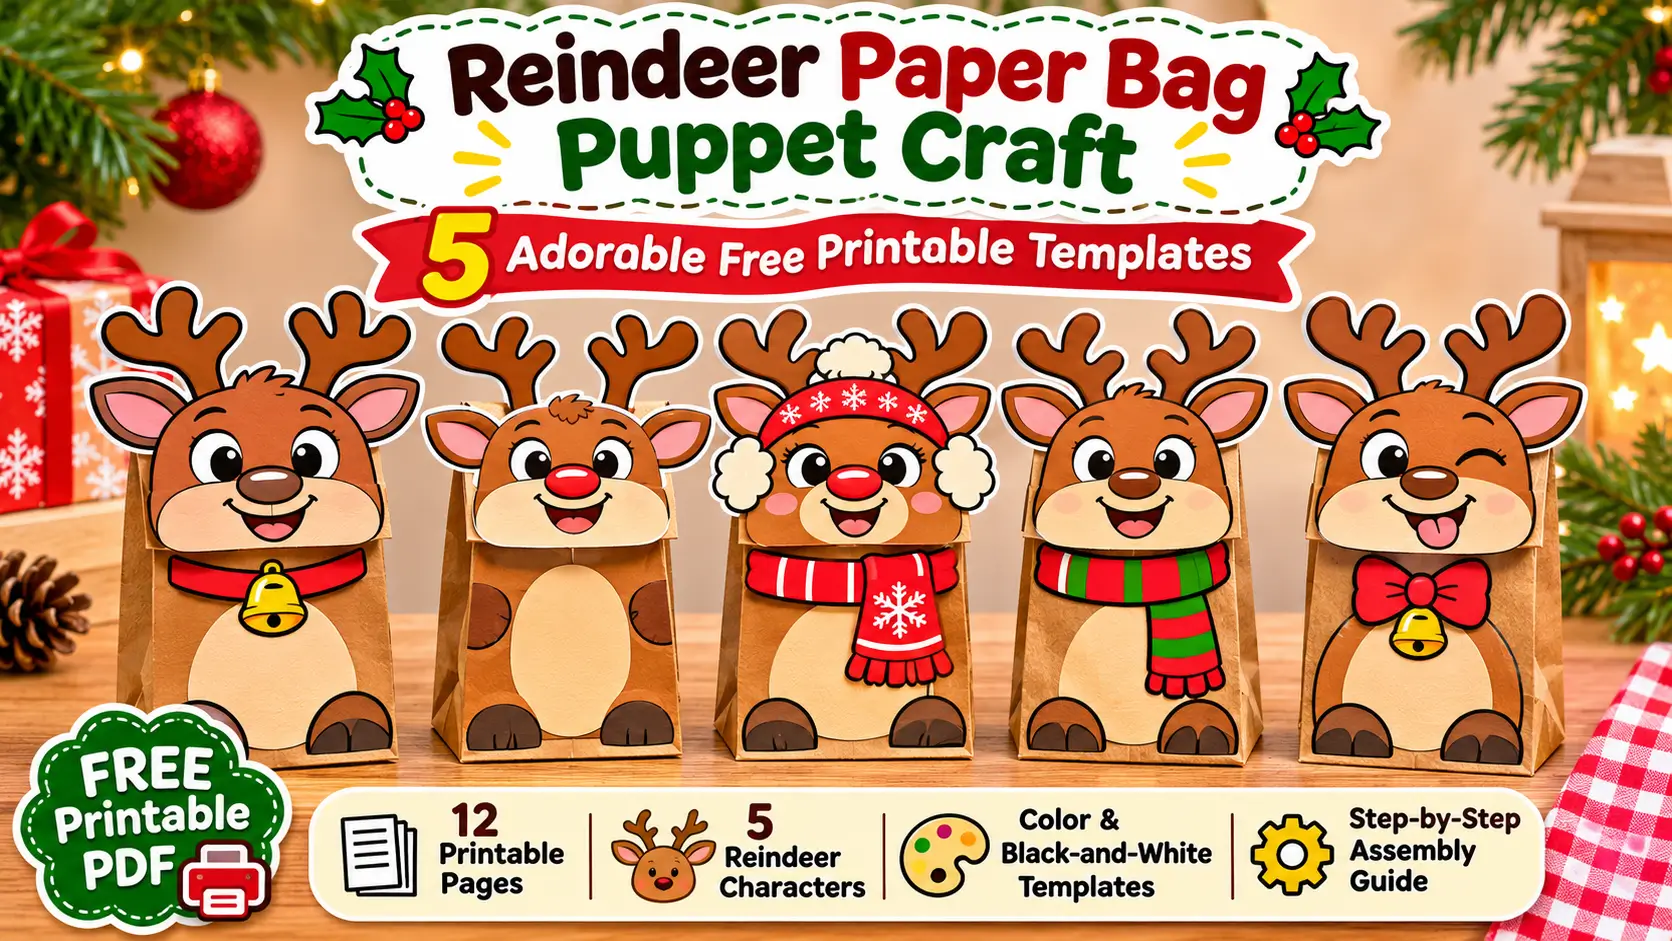
Looking for a fun and easy Christmas craft for kids? This reindeer paper bag puppet craft turns an ordinary brown paper lunch bag into an adorable reindeer puppet that children can decorate, assemble, and use for storytelling.
With five different reindeer characters to choose from, children can create their own Christmas puppets using simple materials such as paper bags, scissors, glue, and crayons.
The best part? You can download the free printable reindeer puppet templates and get started without drawing or designing anything yourself.
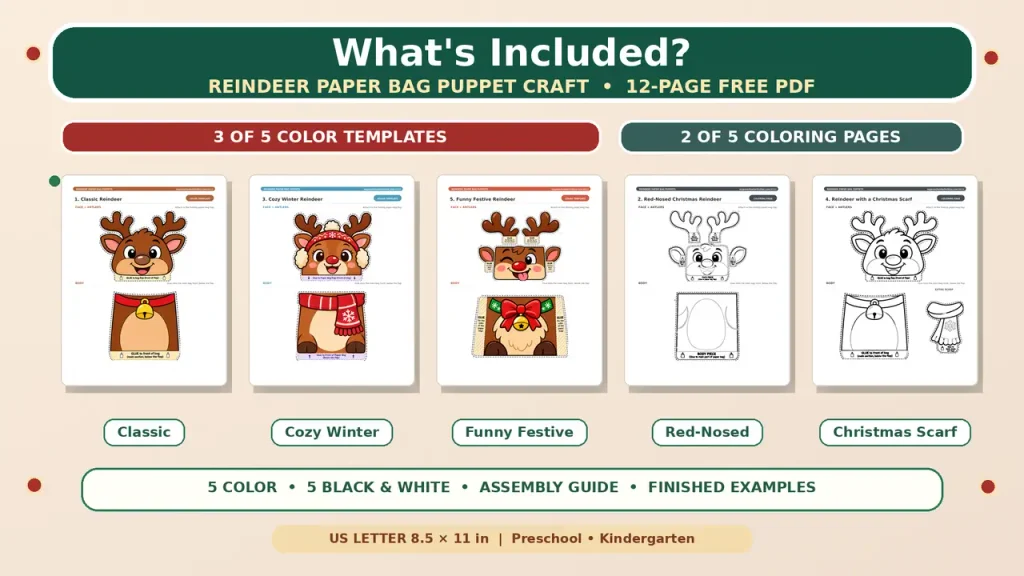
This 12-page printable PDF includes five colorful reindeer designs, five matching black-and-white templates, an illustrated assembly guide, and examples of finished puppets.
The activity is ideal for preschoolers, kindergarteners, and early elementary children ages 4–8. It works beautifully for December classroom crafts, Christmas parties, homeschool activities, winter-themed learning centers, and imaginative play.
Once the puppets are finished, children can use them for pretend play, holiday storytelling, and fun classroom puppet shows.
Let’s make some adorable Christmas reindeer!
Download the Free Reindeer Paper Bag Puppet Craft PDF
Ready to make your own reindeer puppet?
Download the complete printable pack and choose your favorite character.
The free printable includes everything you need to create five different reindeer paper bag puppets.
Quick activity details:
- Recommended ages: 4–8 years
- Total PDF pages: 12
- Reindeer characters: 5 different designs
- Printable templates: 5 full-color and 5 black-and-white pages
- Additional pages: 1 assembly guide and 1 finished-puppet example page
- Paper size: US Letter (8.5 × 11 inches)
- Craft materials: Paper bags, scissors, glue, and optional coloring supplies
- Best for: Preschool, Pre-K, kindergarten, homeschool, and elementary Christmas activities
The colored templates are ready to cut and assemble, while the black-and-white versions allow children to color and personalize their own reindeer.
You can print one character or prepare the entire set for a classroom activity.
For younger children, I recommend preparing the more detailed pieces in advance so they can focus on assembling and decorating their puppets.
What’s Included in the Free Reindeer Paper Bag Puppet Printable?
This free reindeer paper bag puppet craft contains 12 printable pages with five different character designs.
Each reindeer is available in both color and black-and-white, giving children two ways to enjoy the activity.
1. Classic Reindeer Puppet
PDF Pages: 1 and 6
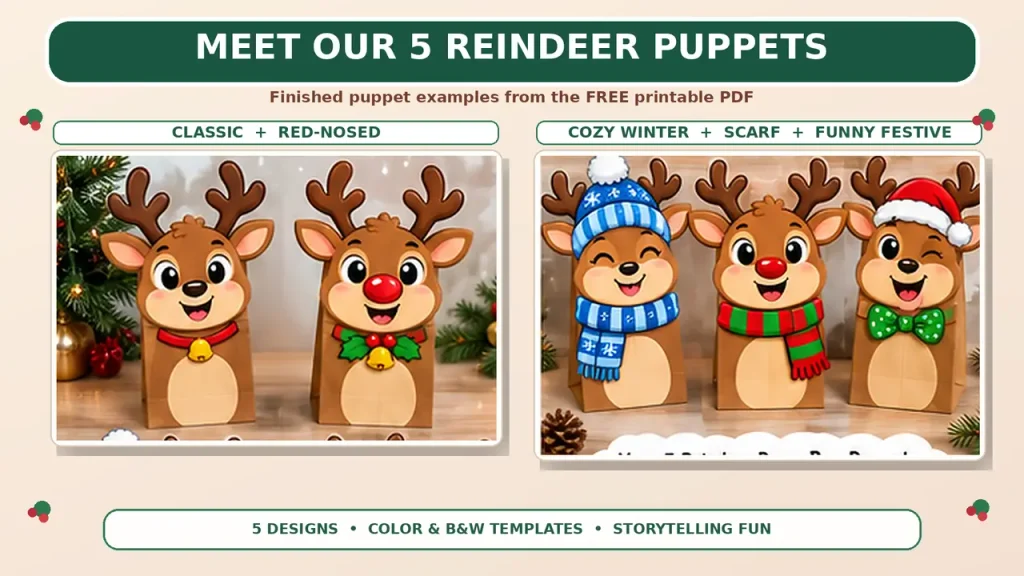
The Classic Reindeer features a friendly brown face, large eyes, pink inner ears, and traditional antlers.
Its body includes a festive collar with a bell, giving it a simple Christmas appearance.
This character is a great starting point for young children who want to make a traditional reindeer.
The ears and antlers are integrated into the main head shape, reducing the number of separate pieces that need to be assembled.
Children can color the black-and-white version using realistic brown shades or choose their own imaginative colors.
Activity idea: Ask children to give their reindeer a name and describe where it lives.
2. Red-Nosed Christmas Reindeer
PDF Pages: 2 and 7
This festive reindeer features a bright red nose and a cheerful expression.
Unlike the Classic Reindeer, this design includes separate antler and ear pieces with marked attachment tabs.
Children can assemble the different parts before attaching the completed head to their paper bag.
The red nose is already included in the face illustration, so there is no separate nose piece to cut.
This design works well for Christmas storytelling, imaginative reindeer adventures, and classroom puppet shows.
Activity idea: Ask children to imagine how their red-nosed reindeer might help its friends during a snowy night.
3. Cozy Winter Reindeer
PDF Pages: 3 and 8
The Cozy Winter Reindeer is dressed for chilly winter weather.
It features an adorable winter hat with fluffy details and a cozy scarf on its body.
The ears are part of the face design, while the antlers are separate pieces that attach using the marked glue tabs.
Children can color the winter accessories in their favorite colors and add decorative patterns to make their puppet unique.
This character is perfect for winter storytelling and January classroom activities as well as Christmas crafts.
Activity idea: Invite children to describe what their reindeer would wear on a snowy day.
4. Reindeer With a Christmas Scarf
PDF Pages: 4 and 9
This cheerful reindeer includes a festive scarf accessory that children can attach to the finished puppet.
The head design includes the ears and antlers, while the extra scarf is supplied as a separate printable piece.
Children can glue the scarf in its designated position after attaching the head and body.
The printable includes a colored version and a black-and-white version that children can decorate themselves.
This design is especially useful for children who enjoy choosing colors and adding their own creative details.
Activity idea: Ask children to invent a story about a reindeer who loses its Christmas scarf and goes searching for it.
5. Funny Festive Reindeer
PDF Pages: 5 and 10
The Funny Festive Reindeer has a playful expression, with one eye winking and its tongue sticking out.
Its festive body features a large decorative bow and bell.
The antlers and ears are separate pieces that attach to the face using the marked glue tabs.
This character is a fun choice for children who enjoy silly voices, jokes, and imaginative storytelling.
The black-and-white version also provides plenty of opportunities for creative coloring.
Activity idea: Invite children to make their reindeer tell a funny Christmas joke or act out a silly adventure.
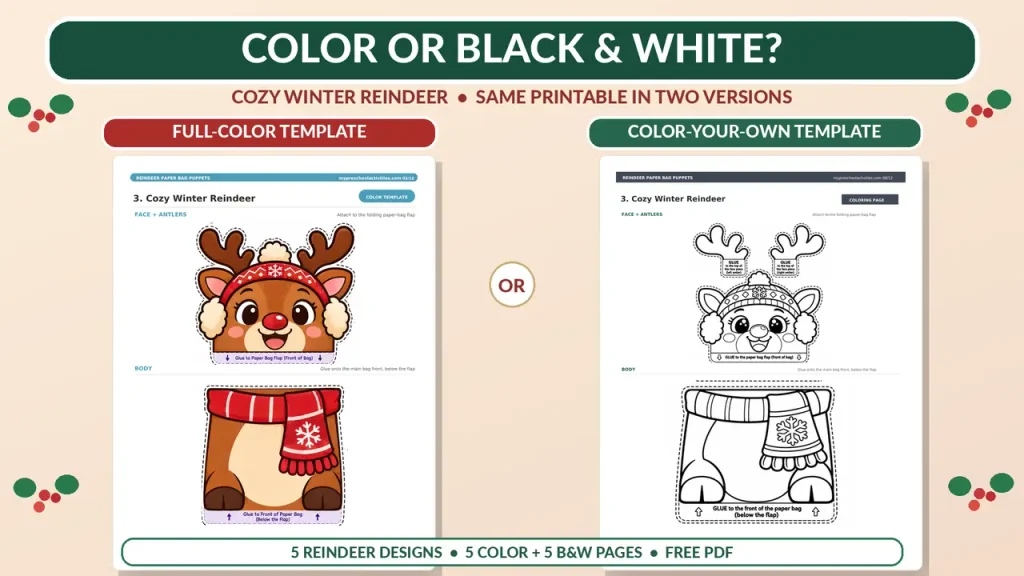
Color and Black-and-White Reindeer Templates
Each of the five characters is available in two printable versions.
Full-color templates
The colored templates are ready for cutting and assembling.
They are useful for younger children, classroom parties, and activities where you want to spend more time playing with the finished puppets.
Black-and-white templates
The black-and-white versions allow children to color their reindeer before cutting and gluing.
Children can decorate the antlers, faces, scarves, and other accessories using crayons, colored pencils, or markers.
These versions also use less color printer ink.
You can offer both options and let children choose the version they prefer.
Assembly Instructions and Finished Puppet Examples
The final two pages help children and adults understand how the craft works.
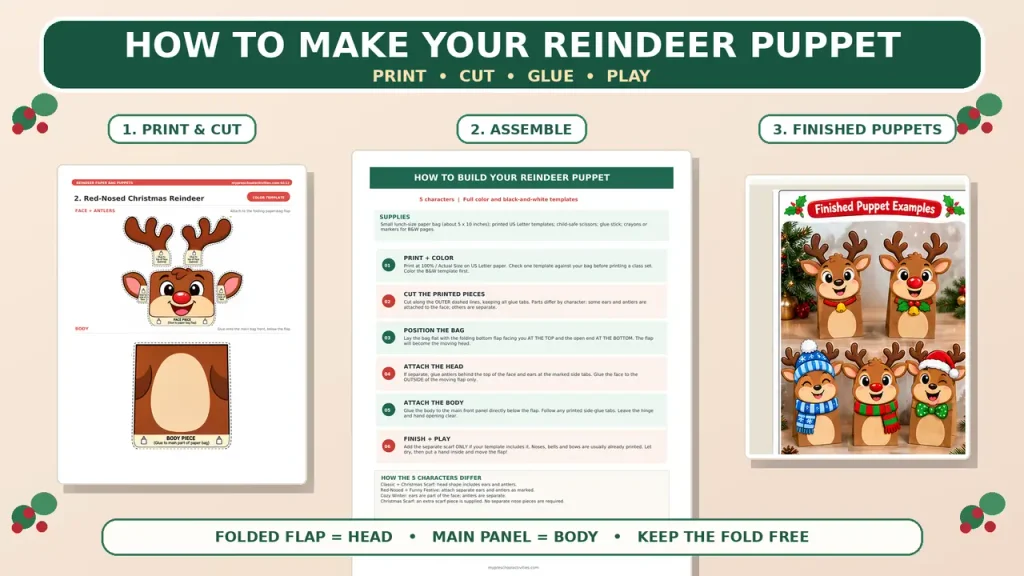
Page 11: How to Build Your Reindeer Puppet
This page provides six assembly steps, including printing, cutting, positioning the paper bag, attaching the head, gluing the body, and finishing the puppet.
It also explains which reindeer characters have integrated ears and antlers and which include separate pieces.
Page 12: The Finished Reindeer Puppets
This page shows an illustrative preview of five completed reindeer puppets.
Use it as a visual example before beginning the craft or as inspiration for a classroom display.
The final appearance may vary depending on your paper bags, coloring choices, and assembly.
Materials Needed for This Reindeer Paper Bag Puppet Craft
You don’t need expensive craft supplies to make these Christmas puppets.
Most of the materials are common classroom or household items.
Essential Materials
- Free printable reindeer puppet templates
- Small, lunch-size brown paper bags, approximately 5 × 10 inches
- Child-safe scissors
- Glue sticks
- Crayons, colored pencils, or markers for black-and-white templates
- A flat work surface
Optional Craft Supplies
For extra decoration, you can use:
- Small pom-poms
- Stickers
- Ribbon scraps
- Decorative paper
- Additional cardstock for reinforcement
- A small tray to organize paper pieces
The printable already includes the main illustrated features, so additional supplies are optional.
Important: Some reindeer have detailed antlers and small attachment tabs. Adult supervision and assistance are recommended when children use scissors.
How to Print and Prepare Your Reindeer Puppet Templates
Preparing the templates correctly helps make the assembly process easier.
Step 1: Download the Printable PDF
Use the download link above to save the free reindeer puppet craft PDF.
The file includes all five characters in colored and black-and-white versions.
Step 2: Choose Your Reindeer
Let children select their favorite character.
For classroom use, you can print several copies of each design so children have a choice.
You don’t need to print all 12 pages for every child.
Print the selected character template and keep the assembly guide available for reference.
Step 3: Select the Correct Paper Size
The templates are designed for US Letter paper measuring 8.5 × 11 inches.
Open the file in a PDF viewer and select the correct paper size.
Start with 100% or Actual Size in your printer settings.
Check the print preview to ensure that the entire template, including the glue tabs and cutting outlines, fits within the printable area.
Step 4: Test the Template Against Your Paper Bag
Before printing a full classroom set, print one sample template.
Place the face piece against the folded flap of your paper bag.
The printable is intended for a small lunch-size bag, but paper bag dimensions can vary between manufacturers.
If necessary, adjust the printing scale slightly after testing the template.
Avoid cutting off glue tabs or important parts of the illustration.
Step 5: Color Before Cutting
If children are using black-and-white templates, encourage them to color the pieces while they are still on the printed page.
This is usually easier than coloring small cut-out shapes.
Allow heavy marker coloring to dry before beginning the cutting activity.
Step 6: Prepare a Craft Station
Place the printed templates, scissors, glue sticks, and paper bags on a clean table.
For younger children, you can pre-cut the detailed antlers or prepare the pieces in advance.
Keeping each child’s pieces together in a small tray can help prevent missing parts.
Before You Start: Understanding the Paper Bag Flap
One of the most important parts of this reindeer paper bag puppet craft is positioning the paper bag correctly.
A standard lunch-size paper bag has a folded bottom flap that can become the puppet’s moving head.
Place the paper bag flat with the folded bottom flap facing you at the TOP and the open end at the BOTTOM.
The flap becomes the reindeer’s head, while the main panel directly below the flap becomes its body.
The opening at the bottom is where a child inserts their hand.
When the child moves their hand inside the bag, the folded flap can open and close to make the puppet appear to talk.
Before gluing anything, show children how this movement works.
Important: The face must be attached only to the moving flap. Do not glue the flap to the body panel underneath it.
Keeping the fold free allows the puppet’s mouth to move.
How to Make a Reindeer Paper Bag Puppet: Step-by-Step Instructions
Follow these simple steps to turn your printable into a working Christmas reindeer puppet.
Step 1: Choose and Color Your Reindeer
Start by selecting one of the five printable reindeer designs.
If using a black-and-white template, color the head, body, and any separate accessories.
Children can choose traditional brown reindeer colors or create their own imaginative designs.
Let the coloring dry before moving to the next step if necessary.
Step 2: Cut Along the Outer Dashed Lines
Carefully cut out the printed pieces along the outer dashed cutting lines.
Keep any marked glue tabs attached to their pieces.
The number of separate pieces depends on the reindeer character.
Classic Reindeer: The ears and antlers are part of the main head shape.
Red-Nosed Christmas Reindeer: The antlers and ears are separate pieces.
Cozy Winter Reindeer: The ears are integrated into the face, while the antlers are separate.
Christmas Scarf Reindeer: The main head includes the ears and antlers, and an extra scarf piece is provided.
Funny Festive Reindeer: The antlers and ears are separate pieces with marked glue tabs.
The nose, bells, and bows are generally already printed as part of the illustrations.
There is no need to cut out a separate nose.
Teacher tip: For younger children, an adult can cut the detailed antlers and small attachment areas in advance.
Step 3: Position the Paper Bag Correctly
Lay the paper bag flat on the table.
Make sure the folded bottom flap is facing upward, toward the top of your work area.
The open end of the paper bag should be at the bottom.
The folded flap will hold the reindeer’s moving head.
The flat panel below it will hold the body.
Try opening and closing the flap before attaching the paper pieces.
This helps children understand how their puppet will work.
Step 4: Assemble and Attach the Reindeer Head
If your chosen character includes separate antlers, glue them behind the top of the face using the marked tabs.
If the ears are separate, attach them at the indicated side positions.
For characters with integrated ears and antlers, no additional assembly is needed for those parts.
Next, apply a thin layer of glue to the back of the completed face.
Position it carefully on the outside of the folded paper bag flap.
Press gently to secure it.
Keep glue away from the folding hinge and the main bag panel below.
The flap must remain free to move.
Step 5: Glue the Reindeer Body Below the Flap
Take the printed body piece and position it on the main front panel of the paper bag.
It should sit directly below the folded flap.
Align it so the head and body appear connected when the flap is closed.
Apply glue to the appropriate areas on the back of the body, following any printed side-glue tabs.
Press it gently into place.
Make sure the glue does not reach the moving fold or close the bag opening.
Step 6: Add the Extra Scarf If Included
If you selected the Reindeer with a Christmas Scarf, attach the separate scarf accessory in the marked position.
The other characters already include their main decorative features in their printed designs.
You can add optional classroom craft decorations, but avoid placing heavy materials on the moving flap.
Step 7: Let the Puppet Dry
Place the puppet on a flat surface and allow the glue to dry.
Avoid lifting or moving it too soon, especially if you attached separate antlers or ears.
If the paper begins to wrinkle, check that you haven’t used too much glue.
A glue stick usually works well for lightweight paper pieces.
Step 8: Make Your Reindeer Talk!
Once everything is dry, slide your hand into the open bottom of the bag.
Gently move the folded flap to make the reindeer’s mouth open and close.
Your Christmas reindeer puppet is ready for storytelling and pretend play!
Encourage children to introduce their reindeer, give it a name, and invent a short story.
Common Reindeer Puppet Craft Problems and Easy Fixes
Even a simple paper bag craft can sometimes need a few adjustments.
Here are solutions to the most common problems.
The Puppet’s Mouth Won’t Move
This usually happens when glue reaches the folding flap or connects the flap to the body.
The flap should move independently.
If the glue is still wet, carefully separate the pieces and wipe away excess glue.
If the glue has already dried, avoid pulling hard enough to tear the bag.
For future puppets, apply glue only to the intended attachment areas.
The Antlers Keep Falling Off
Some characters have separate antler pieces with small attachment tabs.
If the antlers are loose, apply a little additional glue to the marked tabs and hold them briefly in position.
Allow the puppet to dry flat.
For additional strength, you can reinforce the back of the attachment with a small piece of paper or tape.
The Face Doesn’t Fit the Paper Bag
Paper lunch bags are not all the same size.
Check whether the template was printed at Actual Size and compare it with your bag.
If your bags are smaller or larger than expected, adjust the printing scale after testing one template.
Keep all glue tabs and important illustrated details inside the printable area.
Children Have Difficulty Cutting the Antlers
Antlers can have curved edges and narrow sections.
Younger children may find these difficult to cut independently.
Try cutting the detailed parts in advance or allowing children to focus on the larger body and face pieces.
You can also use simpler cutting boundaries where appropriate without removing attachment tabs.
The Paper Bag Wrinkles
Using too much liquid glue can make thin paper wrinkle.
A glue stick is usually easier to control.
Apply a thin layer, press the paper into place, and let the puppet dry on a flat surface.
The Body or Accessories Fall Off
Check that the glue has been applied to the marked attachment areas.
Press the pieces gently against the bag and allow enough drying time.
Avoid playing with the puppet until the attachments are secure.
Why Reindeer Paper Bag Puppet Crafts Are Great for Kids
This reindeer paper bag puppet craft offers more than a fun Christmas decoration.
It combines a hands-on creative activity with opportunities for imaginative play, speaking, listening, and following instructions.
Fine Motor Practice
Cutting, coloring, gluing, and positioning paper pieces all require hand coordination.
Children practice holding scissors, controlling crayons, and placing small pieces in the correct positions.
These activities provide opportunities to develop fine motor control through repeated practice.
Following Directions and Sequencing
Making a puppet involves completing several steps in order.
Children learn to:
- Choose a character.
- Color the printable.
- Cut out the pieces.
- Position the paper bag.
- Attach the head and body.
- Allow the glue to dry.
- Use the completed puppet.
Ask children questions such as “What do we do first?” and “What comes next?”
These simple discussions help reinforce sequencing vocabulary.
Imaginative Play and Storytelling
A finished puppet can become a character in a child’s own story.
Children can imagine where their reindeer lives, what it likes, and what adventures it experiences.
They can use different voices, invent conversations, and create simple storylines.
The National Association for the Education of Young Children (NAEYC) discusses how dramatic play and props, including paper bag puppets, can provide opportunities for children to practice storytelling and language.
Read more in NAEYC’s article about dramatization and early literacy.
Language Development
Reindeer puppets provide natural opportunities to introduce and use words such as:
Antlers, ears, flap, scarf, winter, snowy, reindeer, festive, cheerful, and playful.
Encourage children to describe their puppets and explain their choices.
You might ask:
“What is your reindeer’s name?”
“Where does your reindeer live?”
“What does your reindeer like to do?”
“What would your reindeer say to a friend?”
These open-ended questions encourage conversation and imaginative responses.
Creativity and Personal Expression
With five different characters and both colored and black-and-white versions, children can make their own choices.
Some may prefer the classic brown reindeer, while others may create a purple reindeer with colorful winter accessories.
Allowing children to personalize their crafts can make the activity more meaningful and enjoyable.
Five Fun Reindeer Puppet Activities for Preschool and Kindergarten
Once the puppets are finished, there are many ways to continue the activity.
1. Reindeer Puppet Introductions
Invite each child to introduce their reindeer to the group.
They can say its name, describe its appearance, and share something it likes.
For example:
“Hello! My name is Snowy. I love winter and playing with my reindeer friends!”
This is a simple activity for circle time or small-group speaking practice.
2. Christmas Reindeer Puppet Show
Create a simple puppet theater using a table, cardboard box, or classroom display area.
Let children take turns performing short stories with their reindeer.
You can provide a basic story idea, such as a group of reindeer preparing for a snowy Christmas adventure.
Encourage children to use their puppets to speak, answer questions, and interact with other characters.
3. Reindeer Emotion Game
Ask children to make their puppets express different feelings.
For example:
“Show me a happy reindeer.”
“What would a surprised reindeer say?”
“How can you help a reindeer who feels sad?”
Children can change their voices and movements to represent different emotions.
This activity provides an opportunity to discuss feelings and kindness.
4. Reindeer Christmas Parade
Have children line up with their completed puppets.
Invite them to move their reindeer around the classroom in a pretend Christmas parade.
Children can give their puppets names and introduce them one at a time.
You can also use the parade as a fun way to practice counting.
Ask:
“How many reindeer are in our parade?”
“Who is first?”
“Who is last?”
5. Reindeer Storytelling Circle
Sit together in a circle.
Begin a story with a simple sentence:
“One snowy morning, five reindeer went on an adventure.”
Pass the storytelling opportunity around the group.
Each child uses their puppet to add one sentence to the story.
This encourages listening, imagination, and turn-taking.
How to Adapt the Reindeer Puppet Craft for Different Ages
The activity can be adjusted for children with different skills and levels of independence.
Preschoolers Ages 4–5
For younger preschoolers, use the colored templates and prepare detailed pieces in advance.
Focus on simple tasks:
- Choosing a character
- Gluing prepared pieces
- Adding optional decorations
- Naming the puppet
- Participating in short pretend-play activities
Demonstrate one step at a time.
Younger children may need help holding the bag in the correct position while gluing.
Kindergarteners Ages 5–6
Kindergarten students may be ready to complete more of the craft independently.
Encourage them to color their own templates, cut larger pieces, and follow the assembly guide.
Help with the more detailed antlers or small tabs when needed.
Once their puppets are finished, ask children to invent short conversations between two reindeer.
Early Elementary Children Ages 7–8
Older children can use the craft as part of a more detailed storytelling project.
Invite them to:
- Design additional paper accessories.
- Create a character personality.
- Write a short puppet script.
- Perform a small-group puppet show.
- Help younger children assemble their puppets.
This allows older children to practice creativity, writing, and communication.
Children Who Need Additional Support
Some children may benefit from pre-cut pieces, thicker paper, adapted scissors, or help with positioning.
You can simplify the activity by offering one character and preparing the smaller pieces beforehand.
Children can still enjoy choosing colors, gluing the main pieces, and using the finished puppet for pretend play.
The important goal is meaningful participation rather than making every puppet look identical.
Reindeer Paper Bag Puppets for Classroom Christmas Activities
These printable reindeer puppets can be used in several classroom settings.
December Craft Centers
Set up a craft center with printed templates, glue sticks, paper bags, and coloring supplies.
Allow children to select a character and complete the activity with appropriate support.
Keep the assembly guide visible for reference.
Christmas Classroom Parties
The colored templates are especially useful for holiday parties when time is limited.
Prepare detailed pieces in advance and allow children to assemble their own puppets.
Once the glue is dry, the children can use their reindeer for a short puppet show or Christmas parade.
Winter Dramatic Play Centers
The Cozy Winter Reindeer can be used in winter-themed dramatic play beyond Christmas.
Add paper snowflakes, a cardboard forest backdrop, or other simple decorations.
Children can invent stories about snowy adventures and reindeer friendships.
Bulletin Board Displays
Finished reindeer puppets can also be displayed in the classroom.
Arrange the five character styles together or create a bulletin board featuring each child’s completed reindeer.
You might use a title such as:
Our Adorable Reindeer Friends!
Write each child’s name near their puppet to create a festive classroom display.
For another easy holiday activity, explore our free Christmas coloring pages for kids.
They provide a quiet coloring activity for children who finish their puppets early.
A Simple Reindeer Puppet Story Retelling Activity
After completing the craft, invite children to use their puppets to create or retell a simple story.
This activity requires no additional printable materials.
How to Play
Step 1: Give each reindeer a name.
Step 2: Choose a setting, such as a snowy forest, a winter village, or a cozy barn.
Step 3: Introduce a small problem.
For example, one reindeer has lost its scarf or needs help finding its way home.
Step 4: Ask children to explain what their reindeer would do.
Step 5: Let the reindeer characters work together to solve the problem.
Step 6: Finish with a happy ending.
Children can act out their stories individually, in pairs, or in a small group.
For older students, encourage them to write or draw the beginning, middle, and end of their story.
If you’re planning more Christmas craft activities, you may also enjoy our free Nativity crafts for kids.
Frequently Asked Questions About Reindeer Paper Bag Puppet Crafts
Is this reindeer paper bag puppet craft free?
Yes! The reindeer paper bag puppet craft is available as a free printable PDF.
The download includes five reindeer characters in both colored and black-and-white versions, an assembly guide, and a page showing finished examples.
How many pages are included in the printable?
The complete printable contains 12 pages.
There are five full-color character templates, five matching black-and-white templates, one assembly instruction page, and one finished-puppet example page.
What size paper bag should I use?
The printable is intended for a small lunch-size paper bag, approximately 5 × 10 inches.
Since bag dimensions may vary, print one test template and compare it with your bag before preparing multiple copies.
What paper size should I use for printing?
Use US Letter paper measuring 8.5 × 11 inches.
Start with Actual Size or 100% printing and check the print preview before printing.
Do all five reindeer have separate antlers and ears?
No.
Some character designs include ears and antlers as part of the main face illustration, while others have separate pieces with glue tabs.
The printable assembly guide explains these differences.
Do I need to cut out the reindeer’s nose separately?
No. The noses are already included in the face illustrations.
There is no separate nose piece required for assembly.
Which side of the bag should face upward?
Place the bag flat with the folded bottom flap at the top and the open end at the bottom.
Attach the reindeer’s face to the moving flap and the body to the main panel below it.
How do I make the puppet’s mouth move?
Insert your hand through the open bottom of the bag.
Move the folded flap with your hand to make the puppet appear to talk.
Make sure the flap has not been glued to the body panel.
Can preschoolers make these puppets independently?
Some children may be able to complete simple steps independently, but younger preschoolers will often need help with cutting, positioning, and assembling the pieces.
Adult assistance is recommended for detailed antlers and small attachment tabs.
Can children color their own reindeer?
Yes!
The printable includes five black-and-white templates that children can color using crayons, colored pencils, or markers.
Can I print the templates on cardstock?
Yes, provided your printer supports it.
Cardstock may help reinforce some parts, although regular printer paper is easier for young children to cut and is suitable for most of the craft.
What can children do with their finished puppets?
Children can use the reindeer puppets for storytelling, dramatic play, Christmas classroom parties, puppet shows, winter activities, and holiday displays.
Make Your Own Reindeer Paper Bag Puppet Today!
This reindeer paper bag puppet craft is a fun and creative way to combine Christmas crafting with hands-on learning.
With five adorable character designs, colored and black-and-white templates, and easy-to-follow assembly instructions, the free 12-page printable provides everything you need to get started.
Children can practice cutting, gluing, following directions, and using their imaginations while creating a puppet they can enjoy long after the craft is finished.
Whether you’re planning a preschool Christmas craft, a kindergarten holiday activity, or a fun project at home, these printable reindeer puppets are an easy choice.
Choose your favorite reindeer, gather your paper bags, and get ready for a little Christmas creativity!