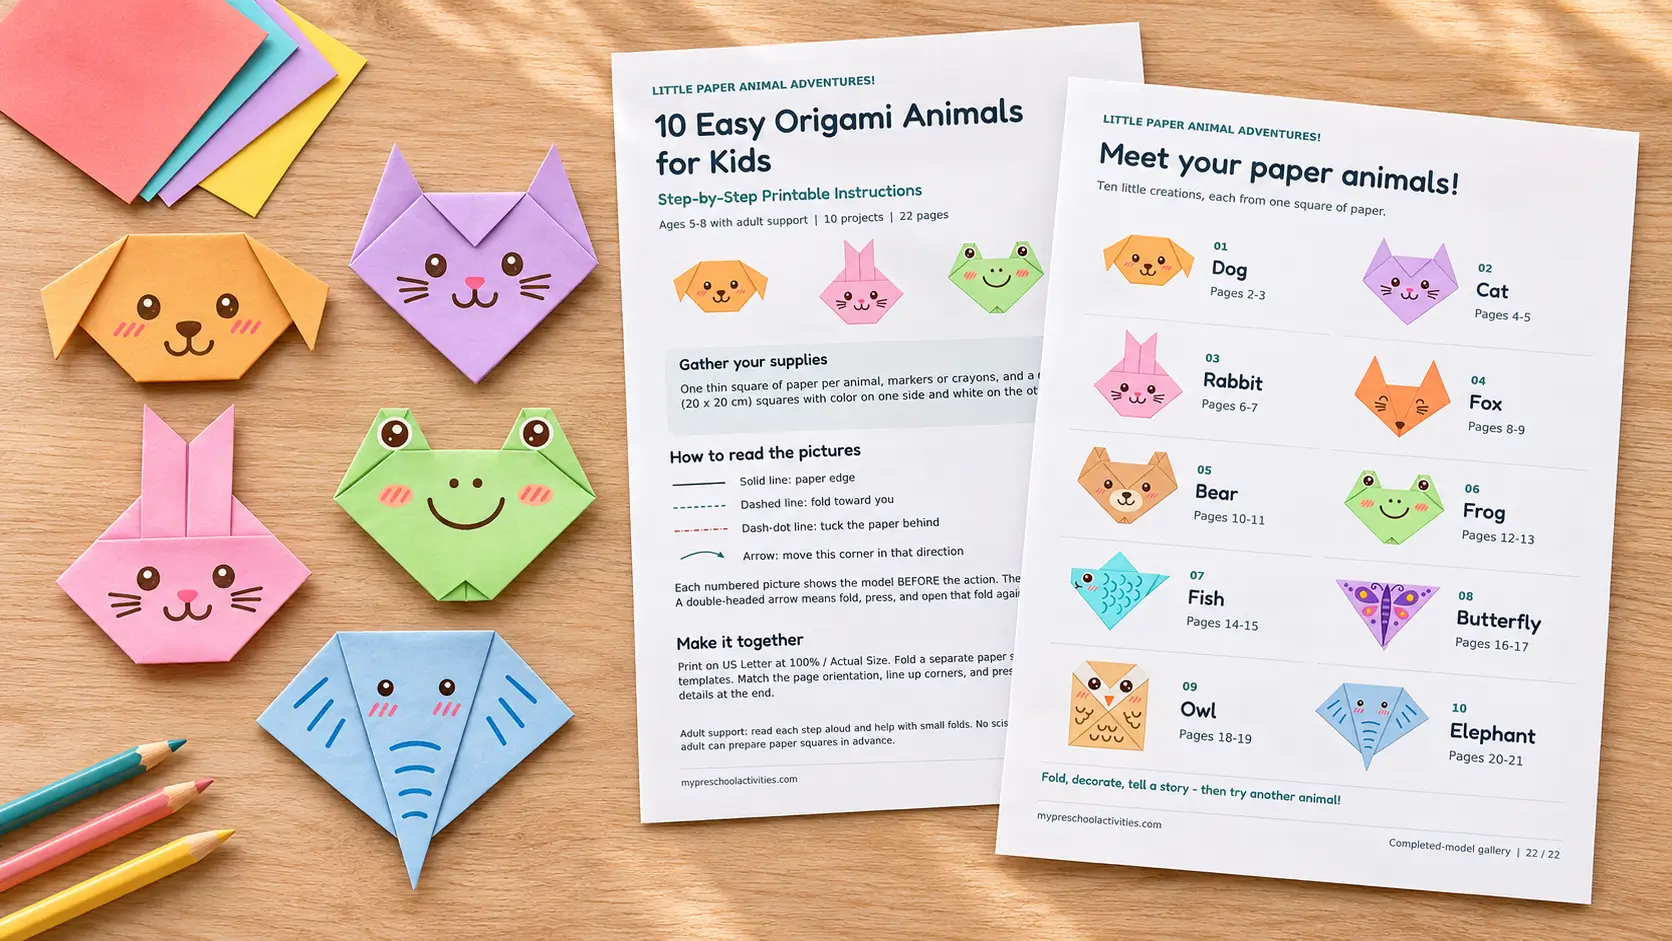
A square of paper, a few careful folds, and some marker details can become a puppy, a woodland fox, or a friendly elephant. These easy origami animals for kids give families and teachers ten paper projects to explore with a free, illustrated instruction pack.
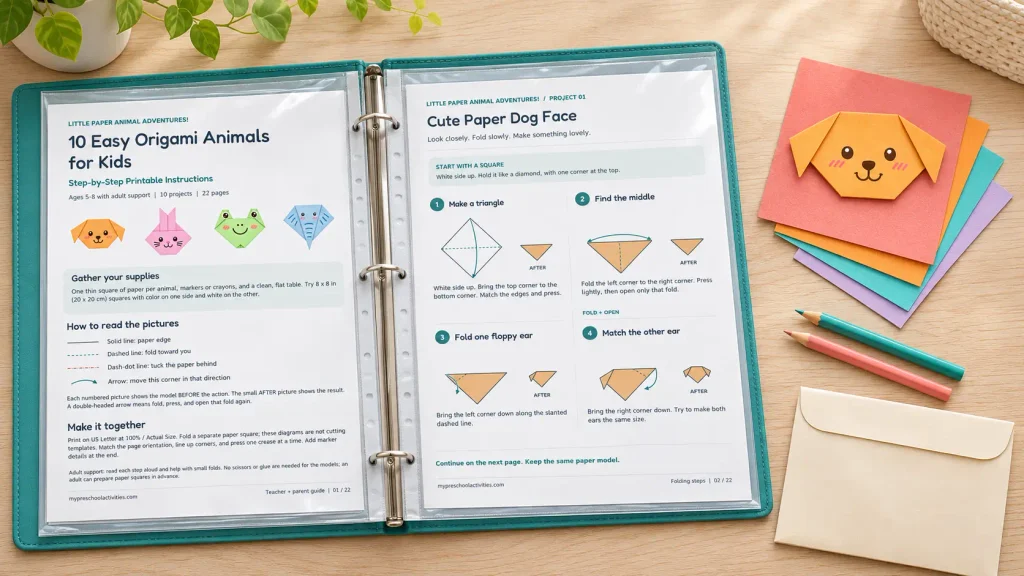
The download contains 22 US Letter pages, including a parent and teacher guide, two pages for each animal, and a gallery of all ten finished designs. It is intended for ages 5 to 8 with adult support. Younger children can join in by choosing colors, helping with a crease, and decorating while an adult manages the folding.
Below, you will find the exact PDF pages for every project, a guide to reading the diagrams, and practical ways to use the finished animals in play.
What Is Included in These Easy Origami Animals for Kids?
The printable, Little Paper Animal Adventures!, combines numbered folding diagrams with short written directions. Each animal has a first page of instructions followed by a second page that continues the project and shows a decorated example.
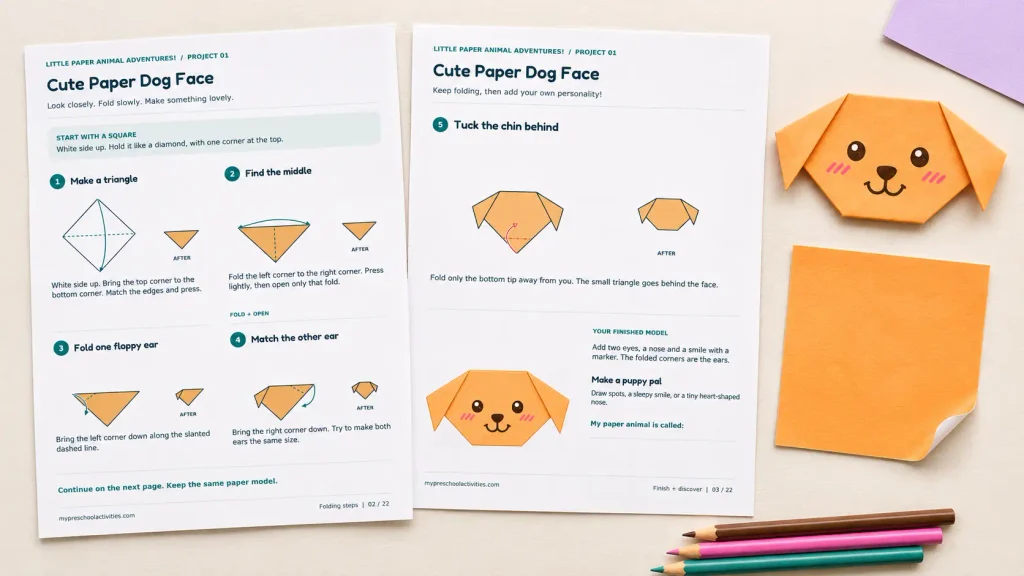
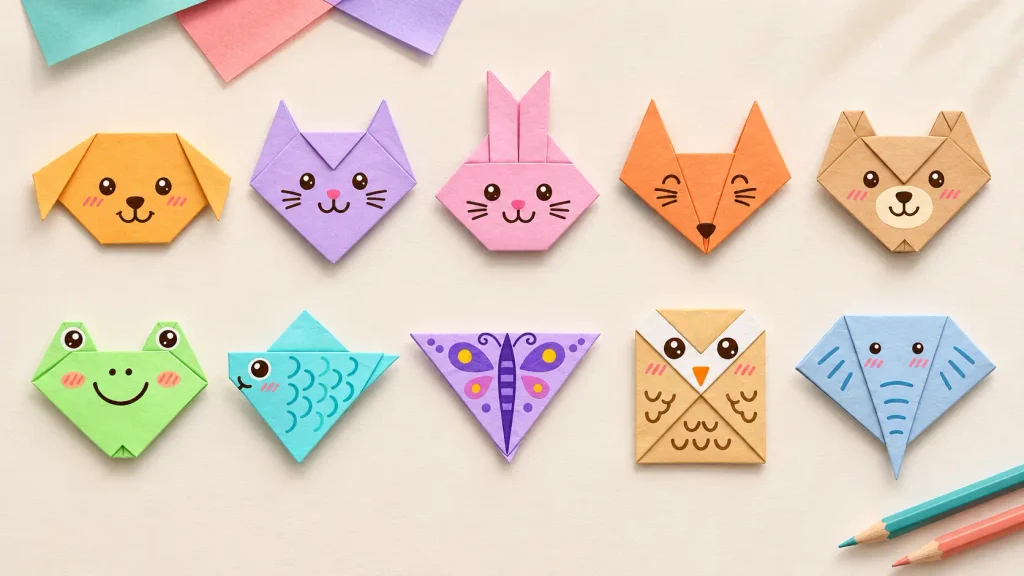
There are eight animal face projects, a fish, and a simple triangular butterfly. Children fold a separate paper square, then add eyes, noses, patterns, and other details with markers or crayons.
| Project | PDF pages | Details to notice |
|---|---|---|
| Parent and teacher guide | 1 | Supplies, diagram symbols, printing, and adult support |
| Dog face | 2–3 | Downward folded ears and a tucked chin |
| Cat face | 4–5 | Pointed ears, a forehead fold, and drawn whiskers |
| Rabbit face | 6–7 | A folded band that becomes two upright ears |
| Fox face | 8–9 | Tall pointed ears and a nose at the lower point |
| Bear face | 10–11 | Shortened ear tips and a small chin fold |
| Frog face | 12–13 | Two upper eye flaps and a drawn smile |
| Fish | 14–15 | A raised fin, tail folds, and a small nose fold |
| Butterfly | 16–17 | A triangular folded shape with drawn wing patterns |
| Owl face | 18–19 | Corners folded inward and large drawn eyes |
| Elephant face | 20–21 | Side flaps for ears and a long central point |
| Completed model gallery | 22 | All ten animal examples with their page references |
These numbers refer to the pages in the PDF, including the opening guide. To print only the dog, for example, select pages 2–3 in your printer settings.
Supplies for Easy Paper Folding Animals
Prepare a small selection of materials before inviting children to the table:
- One thin square of paper for each animal, plus spare squares
- Printed instructions for the chosen project
- Markers, crayons, or colored pencils
- A clear, flat working surface
- A folder or tray for the instructions and finished models
The PDF recommends 8 × 8 inch squares, approximately 20 × 20 cm, with color on one side and white on the other. The two different sides help children compare their paper with the colored and white areas in the diagrams.
The printed instruction pages are not cutting templates. Keep them beside the child and fold a separate square of paper.
The animal models do not require scissors or glue. If you are preparing squares from rectangular paper, an adult can cut them before the activity. Tape or glue is only an optional extra for later display and puppet projects.
Choose Paper That Folds Comfortably
Thin paper is a useful starting point for origami animals for beginners. Thick cardstock creates bulky layers, especially around ears, eye flaps, and small tucked corners.
Begin with the size suggested in the guide. If you use printer paper, check that each square has straight, equal sides. An uneven starting shape makes it harder to align corners later.
Let children choose from two or three colors. A small choice keeps the table manageable while leaving room for a blue dog, a pink elephant, or a green butterfly.
How to Read the Animal Origami Printable Instructions
Before making these easy origami animals for kids, look through page 1 together. Introduce the marks on the diagrams using a spare square so children can connect the picture with a movement.
Follow the Numbers and the AFTER Pictures
In this pack, each large numbered drawing shows the model before the action. The smaller picture labeled AFTER shows the result of that action.
Use the same routine for each step:
- Find the next number.
- Read the short direction aloud.
- Look at the line and arrow on the large diagram.
- Make the fold with the separate paper square.
- Compare the result with the small AFTER picture.
When a project continues on the next page, keep the same paper model. The second page is a continuation, not another animal to start from a new square.
Notice the Different Lines
The guide uses a solid line for a paper edge, a dashed line for a fold toward you, and a dash-dot line for a fold behind the model.
Point to one example at a time. Rather than asking a child to memorize every symbol, explain the movement when it appears: “This little point goes behind the face.”
Some steps ask children to fold, press, and open that fold again. The crease remains as a guide for the next movement. Opening a fold at these steps is part of the instructions.
Check Which Side Faces Up
The projects begin with the white side of the square facing up. Follow the direction for each animal, because the first triangle does not always point the same way.
Also distinguish turning the paper over from rotating it on the table. Turning over reveals the other face of the paper. Rotating changes its direction while keeping the same face visible. The butterfly, for example, includes a half-turn on the table.
For additional practice with traditional figures and folding symbols, explore Let’s Make Origami! from Kids Web Japan. Its beginner section includes a dog project. Follow the instructions for one particular model at a time, since different guides may use different folding sequences.
Explore 10 Easy Origami Animals for Kids
Use the descriptions below to choose a project. Keep the matching PDF pages beside you for the fold positions, arrows, and changes in orientation.
1. Dog Face
Print PDF pages 2–3.
The dog begins with a triangle made by bringing the top corner down to the bottom corner. A fold-and-open step marks the middle before the two side corners become floppy ears.
The final folding step tucks the lower tip behind the face. Children then draw eyes, a nose, and a smile. Spots and a tiny tongue are optional decorations.
Try making two dogs from different colors and giving each a name. Ask, “Is your puppy sleepy, excited, or ready for a walk?” The answer can guide the expression children draw.
2. Cat Face
Print PDF pages 4–5.
The cat starts with a triangle pointing upward. After finding the middle, children lift the two corners to create pointed ears, tuck the middle top point behind, and turn the model over as shown.
Add two eyes, a small nose, a smile, and three whiskers on each cheek. Children can count the whiskers or choose stripes and spots for their cat.
These beginner origami animal faces work well for a short puppet conversation. Fold a dog and a cat, then invite them to introduce themselves.
3. Rabbit Face
Print PDF pages 6–7.
The rabbit uses a narrow folded band along the bottom of the starting triangle. The ends of this band fold upward to form the two ears.
Keep the first page nearby when moving to page 7. The directions continue with the second ear, a turn-over step, and small folds for the forehead and chin.
Draw the face and pink inner-ear marks after folding. For a simple story setting, place the rabbit on a separate sheet of paper and draw a garden around it.
4. Fox Face
Print PDF pages 8–9.
The fox begins with an upward-pointing triangle and a center crease. Its top point folds down before the model is turned over and the side corners are raised into ears.
A dark nose near the lower point makes the face recognizable. Children can add bright eyes or a sleepy expression.
Orange paper is one option, but any color works for an imaginative character. Ask children to name their fox and describe a place where it might explore.
5. Bear Face
Print PDF pages 10–11.
The bear starts with raised ear corners. Later steps tuck the top point, shorten the ear tips, and fold the lower point before the model is turned over.
Watch the small changes on page 11. An adult can demonstrate these folds on a separate model while the child compares the two papers.
Finish with small eyes, an oval muzzle, and a nose. Make a group of bears in different paper colors, then count or arrange them for a pretend picnic.
6. Frog Face
Print PDF pages 12–13.
The frog has two upper flaps that become the eye bumps. After raising them, follow the forehead, eye-tip, chin, and turn-over steps on the continuation page.
Draw one large eye on each upper bump, then add nostrils and a curved smile. The eye positions help distinguish this character from the other folded faces.
This is a frog face, rather than a jumping frog model. Children can move it by hand during pond stories or place it on a drawn lily pad.
7. Fish
Print PDF pages 14–15.
The fish introduces a step that moves only the front layer of paper. The remaining layer stays still while the front point is lifted to form a fin.
Follow the tail folds, turn-over step, and nose fold using the diagrams. Pause whenever the directions specify a particular layer or free flap.
Add an eye near the left side, a smile, and drawn scales. Several fish can become a paper school on a blue background, with children drawing bubbles and plants around them.
8. Butterfly
Print PDF pages 16–17.
This project creates a simple triangular paper butterfly. The sequence includes making a triangle, folding it in half, opening the front section, and rotating the model.
Page 17 shows the folded shape before decorating. Children add a slim body, antennae, and wing patterns inside the paper edges.
Try matching dots or colors on the two sides. Children can also invent an uneven pattern and explain their color choices. The decorating stage leaves room for their own ideas.
9. Owl Face
Print PDF pages 18–19.
The owl starts from a square held like a diamond. After marking the middle, children fold the upper and lower points and bring the side corners inward.
Large eyes, a small triangular beak, and feather marks complete the character. Keep those drawn details separate from the folds when explaining the project.
For a display, place the owl on dark paper and draw a branch and stars around it. Invite the child to tell a short nighttime story.
10. Elephant Face
Print PDF pages 20–21.
The elephant keeps a long lower point while the sides are narrowed. Later folds open the side flaps outward to form broad ears before the model is turned over.
Compare the left and right sides after each ear step. Support the layers gently so that moving one flap does not open the whole model.
Draw two eyes and short lines across the trunk. Different starting square sizes can create a family of elephants, provided an adult helps with the smaller folds.
A Simple Lesson Routine for Easy Origami Animals for Kids
Choose one of these easy origami animals for kids for the session. Read its two pages first and prepare a spare square for your own demonstration.
Begin With a Practice Crease
Invite the child to bring two corners together on a spare square. Hold the corners in place, then press along the fold. Open the paper and find the crease together.
This gives you a chance to introduce “corner,” “edge,” and “crease” before following a longer sequence.
Fold Beside the Child
Sit side by side so both models face the same direction. Demonstrate one movement, then give the child time to try it.
Useful prompts include:
- “Which corner moves next?”
- “Does this fold stay closed or open again?”
- “Are we moving one layer or all the layers?”
- “Can we turn our paper to match the picture?”
An adult can hold one part steady while the child presses a crease. Share the task according to the support the child needs.
Decorate After the Folding
Keep markers nearby but introduce them after the model is folded. This helps children place eyes and other details on the face that will remain visible.
Then invite a name or short story. The finished character does not need to match the example’s colors or expression.
For another kind of hands-on practice, explore these fine motor skills worksheets. They offer a separate option when your group wants drawing and tracing alongside paper folding.
Origami for Preschoolers and Mixed-Age Groups
The pack is labeled for ages 5 to 8 with adult support. Origami for preschoolers may involve more shared work, particularly when the instructions call for small tucked folds or moving only one layer.
Younger children can choose paper, point to the next diagram, help press an easy crease, and decorate an adult-folded model. Older children can read the directions, explain a symbol, or demonstrate a fold on their own separate paper.
When using easy origami animals for kids in a classroom, work with a small group first. A tray with one project, its two instruction pages, and matching paper squares keeps materials organized.
Once children understand the routine, they can revisit a familiar animal. Repeating a project allows them to concentrate on a particular movement without learning a new sequence at the same time.
Five Ways to Use These Paper Folding Crafts for Kids
These extra activities use the completed models. They are suggestions for home or classroom play, rather than additional instruction pages in the PDF.
1. Make a Short Puppet Conversation
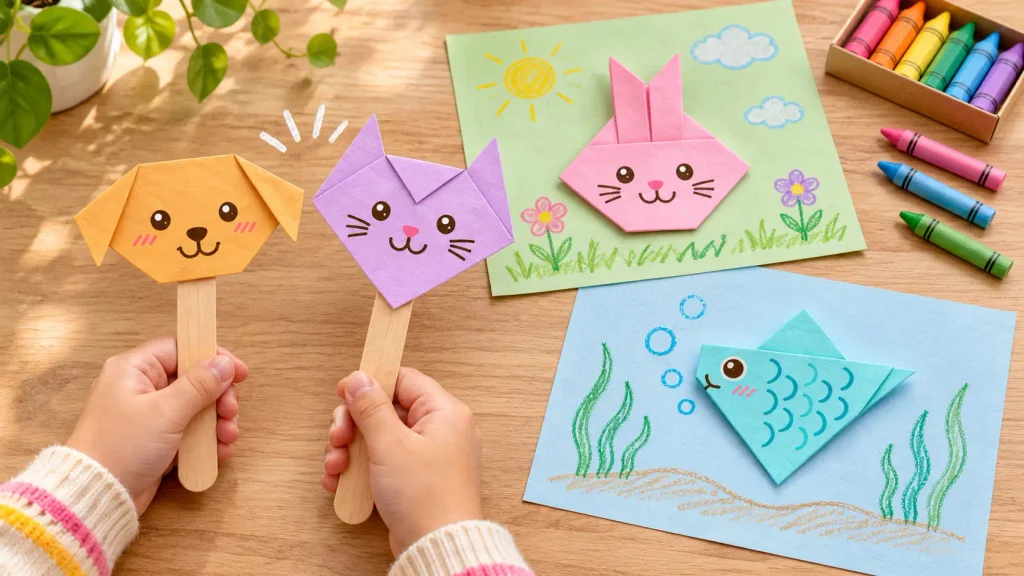
Attach animals to craft sticks with adult help, or simply hold them by an edge. Let two characters ask each other a question: “What is your name?” or “Where are you going today?”
2. Create an Animal Scene
Place fish on blue paper, a rabbit beside a drawn garden, or an owl above a paper branch. Children can draw the background without attaching the animal if they want to use it again.
3. Sort and Count the Collection
Arrange models by paper color, animal type, or a child’s chosen feature. Ask children to explain their groups, count the models, and rearrange them in a different way.
4. Make a Repeating Pattern
Use repeated models or alternate colors: blue dog, yellow dog, blue dog, yellow dog. Begin with a short sequence and invite the child to choose what comes next.
5. Add a Character to a Handmade Card
Mount a finished face on folded cardstock with adult help, then add a message or dictated sentence. Keep the folding instructions in a folder so the same animal can be made again.
For more paper projects and display ideas, browse our Arts & Crafts activities.
Common Paper Folding Problems
| What happens | What to check | A practical next step |
|---|---|---|
| Corners do not meet | The starting paper may not be square, or an earlier fold is uneven | Reopen the latest fold and align the corners before pressing |
| The model faces the wrong way | A rotation or turn-over step may have been missed | Compare the paper with the large diagram and the AFTER picture |
| Too many layers move | The direction may ask for only one front layer or free flap | An adult holds the lower layers while the child moves the required flap |
| Small folds feel difficult | The paper may be too small or thick | Return to a thin 8 inch square and share the precise steps |
| The result differs from the example | A step may have been skipped or a crease placed differently | Go back to the last matching AFTER picture and continue from there |
If a sequence remains unclear, an adult should try it independently before teaching it to the group. Use the numbered diagrams to identify the uncertain step rather than adding an improvised fold just to resemble the final illustration.
Children can stop after one animal or return to an unfinished model later. There is no need to complete all ten easy paper folding animals in one session.
Printing and Reusing the Origami Animals Step by Step Guide
The file is formatted for US Letter paper, 8.5 × 11 inches. The printed sheets show the instructions; the recommended folding squares are separate supplies.
- Open the PDF and choose the animal’s two-page range.
- Select US Letter and start with 100% or Actual Size.
- Check the preview and print one test page. If an edge is clipped, use your printer’s fit-to-printable-area option.
- Print page 1 when you need the general guide, and page 22 for the gallery.
- Keep the instruction pages in a folder or clear sleeves for reuse.
The pack includes colored diagrams and decorated examples. Preview a page before printing in grayscale so the white and colored paper areas remain distinguishable. Keeping the PDF open on a device is another way to follow the instructions without printing every page.
Frequently Asked Questions
What ages are these easy origami animals for kids designed for?
The guide is labeled for ages 5 to 8 with adult support. The help needed depends on the model and the child’s folding experience. Younger children can participate through paper choices, shared creases, and decorating.
How many pages are in the free PDF?
There are 22 pages: one parent and teacher guide, 20 project pages covering ten animals, and one completed model gallery.
Which animals are included?
The set includes a dog face, cat face, rabbit face, fox face, bear face, frog face, fish, butterfly, owl face, and elephant face. Each project uses two instruction pages.
What size paper should we fold?
The guide suggests thin 8 × 8 inch squares, approximately 20 × 20 cm, with color on one side and white on the other. Fold a separate square rather than the printed instruction sheet.
Do the origami animals need scissors or glue?
The models themselves do not need scissors or glue. An adult can prepare squares in advance. Tape or glue is optional when attaching a finished animal to a card, backdrop, or craft stick.
Is the frog a jumping origami frog?
No. The printable contains a folded frog face with upper eye flaps. It can be moved by hand during pretend play, but it is not a springing or jumping model.
Can we reuse the instruction pages?
Yes. Keep the pages beside the working area, use a fresh paper square for each animal, and store the instructions in a folder or clear sleeves.
Download Your Free Easy Origami Animals for Kids PDF
Choose an animal, print its two instruction pages, and prepare a thin square of paper. Follow the numbered pictures, check the AFTER diagrams, and add the face or patterns once folding is complete.
These easy origami animals for kids can become story characters, handmade cards, or a colorful display. Start with one project and keep the page guide nearby for the next animal your child wants to explore.