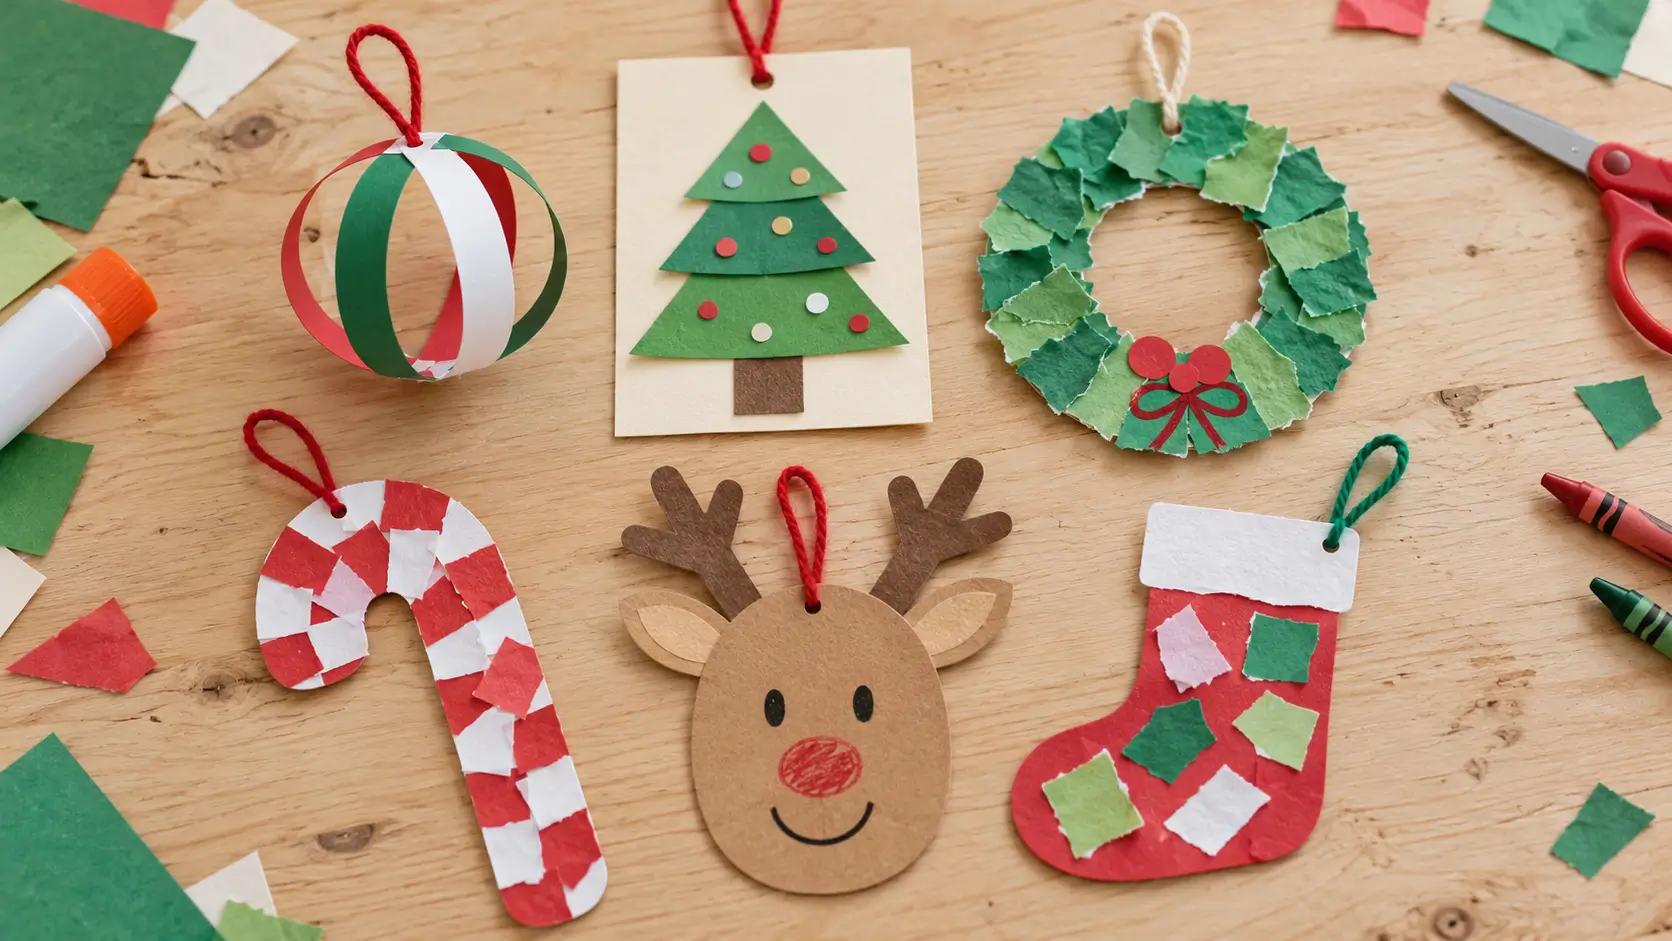
These 10 easy Christmas crafts for kids turn colored paper, light cardstock, and a glue stick into hanging paper ornaments. Each project lists the supplies for one ornament, marks the steps an adult prepares, and ends with a display tip or a fix for the most likely problem.
Some ornaments only need gluing and drawing on precut shapes. Others involve folding, taping, or careful placement, so those steps are marked for adult help. Children can still choose colors, tear paper, glue pieces, and draw patterns on every one of these Christmas crafts.
This guide focuses on decorations to hang. For broader seasonal play such as mittens, snowmen, and melting ice, see these winter activities for preschoolers.
Choose Your Christmas Crafts
Match the project to the paper you have and the help you can give. A younger child can decorate precut shapes and glue pieces in order, while an adult handles cutting, hole punching, and loops. Use the table to choose from these Christmas crafts.
| Project | Paper preparation | Adult help | Finished shape |
|---|---|---|---|
| 1. Paper Strip Bauble | Three 3/4 x 10 in strips, decorated flat | Cuts strips, joins three rings, attaches the loop | Rounded, dimensional |
| 2. Layered Triangle Tree | 4 x 5 in backing, three triangles, one trunk | Cuts pieces, punches the hole | Flat tree on a card |
| 3. Torn Paper Wreath | 4 in card ring, torn green pieces | Cuts the ring and center, punches the hole | Flat ring |
| 4. Folded Circle Bauble | Six 3 in circles | Cuts circles, helps with the final join | Round, dimensional (flat option) |
| 5. Paper Mosaic Candy Cane | 6.5 x 3.5 in cane, ten 1 in pieces | Cuts the cane, punches the hole after decorating | Flat cane |
| 6. Mini Paper Gift | 3.5 in square, two strips, bow pieces | Cuts pieces, secures the loop | Flat square |
| 7. Reindeer Face | Face, two ears, two antlers, back brace | Cuts all shapes, tapes the brace | Flat, layered face |
| 8. Paper Stocking Collage | 5.5 x 4 in stocking, 3 x 1.25 in cuff | Cuts pieces, punches the hole | Flat stocking |
| 9. Paper Bell | 4 in bell, 1 in clapper, border strip | Cuts pieces, punches the hole | Flat bell |
| 10. Paper Frame Keepsake | Two 4.5 in squares, 2.5 in window, 3 in drawing | Cuts the window, punches the hole | Flat framed square |
The wreath, candy cane, stocking, and bell are the best starting points for younger children, because their main jobs are tearing, gluing, and drawing. The two baubles and the frame need the most adult help.
Supplies and Preparation for Paper Ornaments
Nearly all of these Christmas crafts use the same basic supplies. Each tutorial lists the exact pieces for one ornament, so multiply for your group.
Shared supplies
- Colored paper in red, green, white, yellow, brown, and tan
- Light cardstock or clean reused card
- Crayons or washable markers
- Glue sticks and clear tape
- Child-appropriate scissors, plus adult scissors for cardstock
- A hole punch, a ruler, and a pencil
- Yarn or ribbon cut into 6 in (15 cm) pieces for loops
- Round lids or cups about 4 in, 3 in, and 2 in across, plus a small round object about 1 in across
Set up a small workspace. Give each child a tray or box lid holding the pieces for one ornament, a glue stick, and a few crayons. Cover the table with scrap paper and keep a bin for torn bits. Put the tape, hole punch, and yarn at an adult station.
Paper or cardstock? Use regular colored paper for pieces that children tear, fold, or glue on top, and for strips and circles. Use light cardstock for backings, rings, frames, antlers, and any part that must hold a hole. Heavy cardstock is hard for small hands to fold. For these lightweight homemade Christmas ornaments, reinforce each hanging point and check that the attachment holds before displaying it. The listed sizes work with standard US Letter or A4 paper. Use additional sheets when a project needs different colors or a separate cardstock backing.
Who does what. Adults measure and cut cardstock, make every interior cut, punch holes, and attach loops. For an interior cut, the adult punches a hole inside the marked opening, slides a scissor tip into it, and cuts along the line. No craft knives are needed. Children tear, glue, fold simple shapes, and decorate. Keep loops short, and never let a child wear one around the neck.
10 Christmas Crafts to Make with Paper
Each of these Christmas crafts ends in a short loop for hanging. Measurements are in inches with approximate centimeters.
1. Paper Strip Bauble
Three paper rings cross around the same center to form a rounded bauble. Each strip becomes a complete ring before the rings are secured at their crossing points. This gives the ornament six curved ribs without asking children to pull apart a tightly taped stack.
Supplies for one ornament
- 3 colored paper strips, each 3/4 x 10 in (about 2 x 25 cm), cut from one sheet
- 6 in (15 cm) of yarn
- Clear tape and crayons or washable markers
Adult prepares: cutting the strips, helping form and position the rings, taping their crossing points, and attaching the hanging loop.
Steps
- Decorate both sides of the three strips while they lie flat.
- Curve the first strip into a ring. Overlap its ends by about 1/2 in (1.3 cm) and tape the join. This join will sit at the bottom of the ornament.
- Wrap the second strip around the first ring at a right angle. Overlap and tape its own ends near the bottom. An adult adds small pieces of tape where the two rings cross at the top and bottom.
- Wrap the third strip diagonally around the first two rings. Join its ends near the bottom, then tape its top and bottom crossings to the other rings. Keep the sides open and rounded rather than flattening the rings together.
- An adult folds the yarn into a short loop and tapes both tails securely inside the top crossing. Add a second small piece of tape across the tails to hold them in place.
- Turn the bauble gently and adjust the curved sides. Check that all three ring joins and both crossing points hold before hanging it.
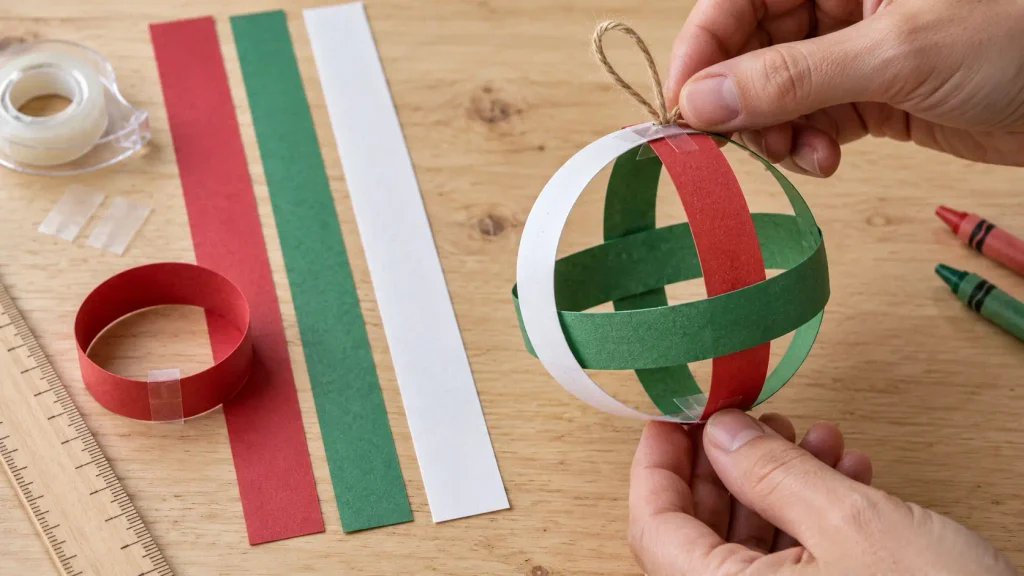
With a 1/2 in overlap, each ring is about 3 in (7.5 cm) across. A slightly uneven shape is fine. If a ring opens, reinforce its overlapped join. Easier option: the child decorates the strips and the adult handles the ring assembly. Among these Christmas crafts, this project needs more help with construction than a flat ornament.
2. Layered Triangle Christmas Tree Ornament
Three overlapping cut triangles build a tree on a card backing. The backing holds every piece and carries the hanging hole.
Supplies for one ornament
- 1 light cardstock backing, 4 x 5 in (10 x 12.5 cm)
- 3 green triangles, each 1.5 in (4 cm) tall, with bases of 3 in, 2.5 in, and 2 in (7.5, 6.5, and 5 cm)
- 1 brown trunk, 3/4 in (2 cm) square
- Glue stick, tape, 6 in of yarn, scrap paper dots or crayons
Adult prepares: cutting all pieces. Press a small square of tape on the back of the backing, then punch a hole centered 3/8 in (1 cm) below the top edge.
Steps
- Lay the backing upright. Glue the trunk at the bottom center, 1/4 in (6 mm) above the bottom edge.
- Glue the 3 in triangle so its base covers the top 1/4 in of the trunk.
- Glue the 2.5 in triangle so its base overlaps the point of the first triangle by about 1/2 in.
- Glue the 2 in triangle the same way over the second.
- Add four to six paper dots or crayon ornaments.
- An adult threads the yarn through the hole and knots the two ends together.
If an edge lifts, rub it flat and add a little more glue. Easier option: the adult lightly marks where each base goes.
3. Torn Paper Wreath Ornament
A card ring covered in overlapping torn green pieces becomes a wreath. Flat Christmas crafts like this one suit younger children well, because tearing and gluing need no cutting.
Supplies for one ornament
- 1 light cardstock ring, 4 in (10 cm) outside diameter and 2 in (5 cm) inside diameter, so the band is 1 in (2.5 cm) wide
- Half a sheet of green paper, about 8.5 x 5.5 in, torn into about 20 pieces of roughly 1 in (2.5 cm)
- 3 red paper dots, 1/2 in (1.3 cm), or a red marker
- Glue stick, tape, 6 in of yarn
Adult prepares: tracing and cutting the outer circle, then making the interior cut for the center. Reinforce the back of the top of the band with tape, then punch a hole 1/2 in from the outer edge.
Steps
- Tear the green paper into small pieces.
- Glue pieces around the ring, overlapping them like leaves. Leave the hole clear.
- Let a few torn points stick out past the outer edge.
- Glue a cluster of three red dots, or draw berries.
- Draw a small bow with a marker.
- An adult threads the yarn through the hole and knots the two ends together.
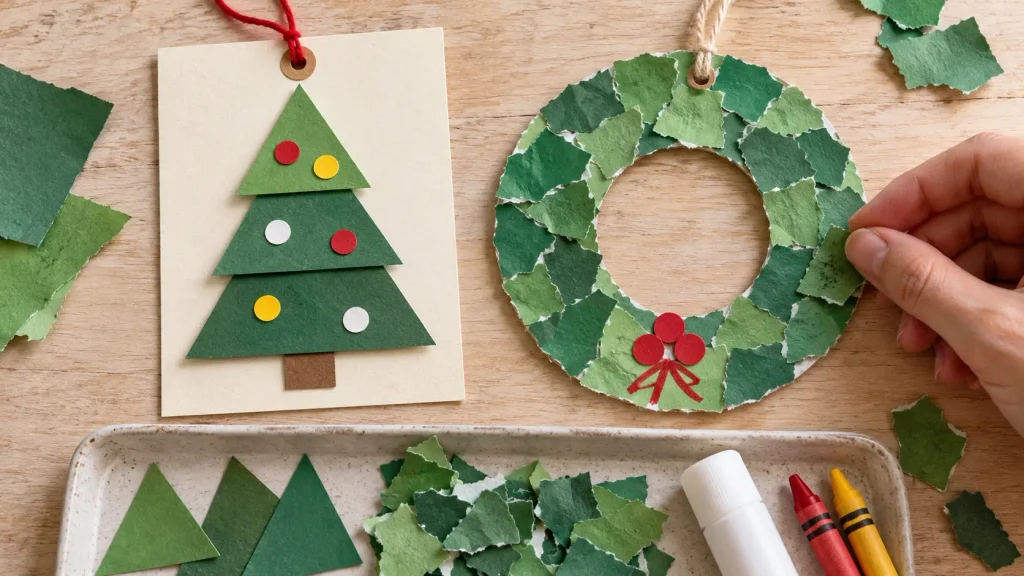
If pieces peel, press them down and add glue under the edges. Easier option: the adult pre-tears the pieces.
4. Folded Circle Bauble
Six folded paper circles join along their outer half faces to make a dimensional bauble. Unlike the strip ornament, this design uses a sequence of glued faces around a shared central fold. It is one of the Christmas crafts that benefits from an adult showing the joining order first.
Supplies for one ornament
- 6 identical paper circles, each 3 in (7.5 cm) across; these fit on one sheet in two columns and three rows
- Glue stick, clear tape, and 6 in (15 cm) of yarn
- Crayons or washable markers
Adult prepares: tracing and cutting the circles, helping line up the folds, making the final join, and securing the hanging loop.
Steps
- Decorate one side of every circle. Fold each circle in half with its decorated side facing inward, then crease the straight folded edge firmly.
- Take circles 1 and 2. Spread glue on one plain outer half face of circle 1 and press it against one plain outer half face of circle 2. Line up their straight folded edges and curved edges.
- Glue a plain outer half face of circle 3 onto the remaining free outer half face of circle 2. Continue in order: attach circle 4 to circle 3, circle 5 to circle 4, and circle 6 to circle 5. The folded edges should stay aligned like the spine of a small booklet.
- An adult folds the yarn into a loop. Tape the two tails along the straight folded edge on the free outer face of circle 6, leaving the loop above the top. Keep most of this face clear for the final glue join.
- Bring the two unglued outer faces together: the free face of circle 6 and the free face of circle 1. Glue them together around the yarn tails, matching the edges, and hold the join until it grips.
- Gently fan the decorated half-circle pages around the center. Let the glue dry before hanging the bauble.
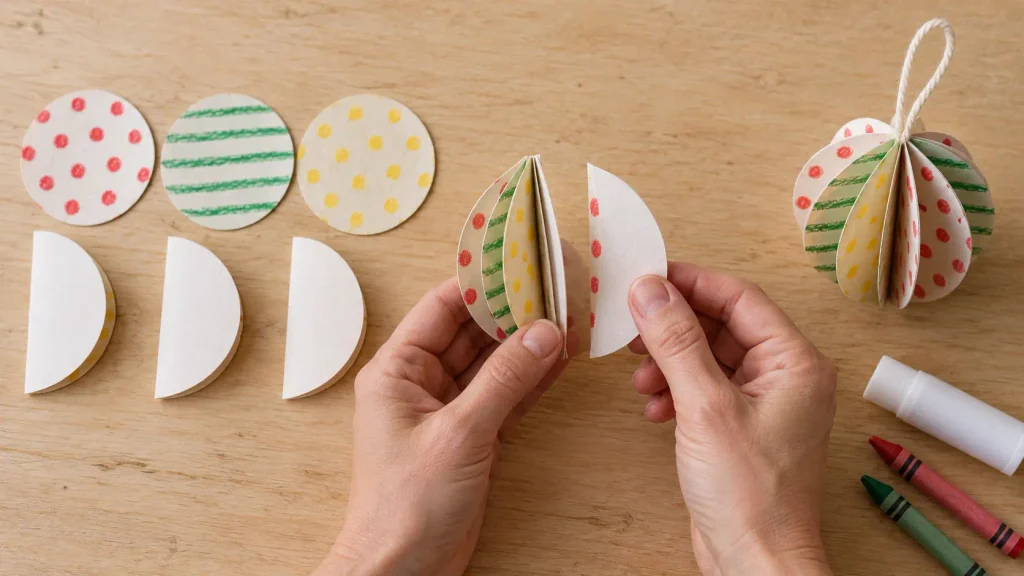
If the final join lifts, reopen only that join, add glue to the paper around the taped tails, and press it closed again. Easier flat option: decorate two circles, tape the yarn tails to the back of one near the top, and glue the circles back to back. This still makes a finished hanging ornament without the six-circle assembly.
5. Paper Mosaic Candy Cane
Red and white paper pieces alternate along a cardstock candy cane, which makes it one of the quickest Christmas crafts in the set. The pieces do not need to be tiny or perfectly aligned. This is a paper ornament only.
Supplies for one ornament
- 1 light cardstock cane, about 6.5 x 3.5 in (16.5 x 9 cm), with a 1 in (2.5 cm) wide stick
- 10 paper pieces, 5 red and 5 white, each about 1 in (2.5 cm) square
- Glue stick, tape, 6 in of yarn
Adult prepares: drawing and cutting the cane, and pressing tape on the back at the top of the curve.
Steps
- Lay the cane flat and glue a red piece at the straight end.
- Glue a white piece next to it, edges touching or slightly overlapping.
- Keep alternating colors along the stick and around the hook.
- Fill small gaps with scraps. Pieces that overhang can be trimmed by an adult.
- An adult punches a hole through all layers near the top of the curve, centered across the stick, then threads the yarn through and knots the two ends together.
Easier option: draw red stripes on a white cane with a crayon.
6. Mini Paper Gift Ornament
A flat square with two crossed paper ribbons and a bow looks like a wrapped present, with no folded box. The loop sits on the back, so nothing covers the decoration.
Supplies for one ornament
- 1 light cardstock square, 3.5 in (9 cm)
- 2 ribbon strips, each 1/2 x 3.5 in (1.3 x 9 cm), in a contrasting color
- 2 bow loops, each about 1 in (2.5 cm) long and 3/4 in (2 cm) wide, plus a 1/2 in (1.3 cm) knot square, or a bow drawn with a marker
- A 1 in (2.5 cm) cardstock scrap, glue stick, tape, 6 in of yarn
Adult prepares: cutting every piece and securing the loop.
Steps
- Decorate the gift square with dots or stripes.
- Glue one ribbon strip down the center from top edge to bottom edge.
- Glue the second strip across the center, edge to edge.
- Glue the two bow loops at the crossing with their points touching and tips angled outward.
- Glue the knot square over the point where the loops meet.
- Turn it over. An adult tapes the yarn tails to the back 1/2 in below the top edge, with the loop above the edge, then glues the cardstock scrap over the tape.
If the bow loops lift, press them down with a dab of glue. Easier option: draw the bow.
7. Reindeer Face Ornament
A brown face sits in front of two antlers and two ears, with a small brace on the back that holds the thin antlers upright. Layering order matters in this one: antlers and ears go behind the face, and the brace goes last.
Supplies for one ornament
- 1 light cardstock face, about 3.5 x 4 in (9 x 10 cm), with rounded corners
- 2 ears, each about 1.25 x 2 in (3 x 5 cm)
- 2 antlers, each about 2.5 in (6.5 cm) tall and 1.75 in (4.5 cm) across, with branches at least 1/2 in (1.3 cm) wide
- 1 brace strip, 1 x 3 in (2.5 x 7.5 cm)
- Markers, glue stick, tape, 6 in of yarn
Adult prepares: cutting all shapes, taping the brace, and attaching the loop.
Steps
- On the front of the face, draw two eyes, a round red nose, and a smile.
- Turn the face over. Glue the bottom 3/4 in of each antler to the back along the top edge, angled outward.
- Glue the bottom 1/2 in of each ear to the back at the sides, below the antlers.
- Glue the brace across the back so it spans both antler bases, and tape its ends.
- An adult tapes the yarn tails to the center of the brace, with the loop rising between the antlers.
- Check the front to make sure both antlers stand upright.
If an antler flops, add tape on the back at its base. Easier option: the adult assembles the antlers and ears, and the child draws the face.
8. Paper Stocking Collage Ornament
A cardstock stocking gets a contrasting cuff and a collage of paper scraps. The cuff doubles the paper at the top, which helps support the hanging hole.
Supplies for one ornament
- 1 light cardstock stocking, about 5.5 in (14 cm) tall and 4 in (10 cm) wide at the foot, with a leg 2.5 in (6.5 cm) wide
- 1 cuff, 3 x 1.25 in (7.5 x 3 cm), in a contrasting color
- 8 to 10 paper scraps, 1/2 to 1 in (1.3 to 2.5 cm)
- Glue stick, tape, 6 in of yarn
Adult prepares: cutting the stocking and cuff, then punching the hole once the cuff is glued.
Steps
- Glue the cuff across the top of the stocking, with the top edges flush. It will overhang each side by 1/4 in.
- Lay the scraps on the stocking to plan the pattern.
- Glue them down, keeping the upper right corner free for the hole.
- Draw heel and toe lines with a crayon.
- An adult presses tape on the back at the upper right, then punches a hole through cuff and leg, 3/8 in below the top edge and 3/4 in from the cuff’s right end.
- An adult threads the yarn through and knots the two ends together.
A stocking is one of the most familiar Christmas crafts, and the cuff keeps the hole from tearing. Easier option: the child glues only large squares.
9. Paper Bell Ornament
A flat bell has a contrasting clapper tucked behind the rim and a decorative border across the front. It uses paper details instead of a real metal bell.
Supplies for one ornament
- 1 light cardstock bell, about 4 in (10 cm) wide at the rim and 4 in tall, with a narrow top about 1.25 in (3 cm) wide
- 1 clapper circle, 1 in (2.5 cm), in a contrasting color
- 1 border strip, 3/4 x 3.5 in (2 x 9 cm)
- Glue stick, tape, crayons, 6 in of yarn
Adult prepares: drawing and cutting the bell, checking the strip against the bell outline and trimming any ends that stick out, and punching a hole 3/8 in below the top edge with tape on the back.
Steps
- Lay the bell face down. Glue the top 1/4 in of the clapper to the back of the rim at the center, so about 3/4 in shows below.
- Turn the bell over and glue the border strip across the lower front, with its bottom edge level with the rim.
- Decorate the border with dots or zigzags.
- Add stripes or small shapes above the border.
- An adult threads the yarn through the hole and knots the two ends together.
If the clapper droops, add tape across its glued part on the back. Easier option: skip the border and draw one.
10. Paper Frame Keepsake Ornament
A card frame with a square window holds a child’s own drawing. Taped behind the window and sealed with a backing, the drawing stays centered. This is the most personal of the Christmas crafts here.
Supplies for one ornament
- 1 light cardstock front, 4.5 in (11.5 cm) square, with a centered 2.5 in (6.5 cm) square window, leaving a 1 in (2.5 cm) border
- 1 backing square, 4.5 in (11.5 cm); the two pieces fit on one sheet, stacked
- 1 drawing on a 3 in (7.5 cm) paper square, or a printed copy of a family photo trimmed to 3 in, used with the family’s permission
- Glue stick, crayons or markers, tape, 6 in of yarn
Adult prepares: cutting both squares and the window, then punching the hole.
Steps
- Decorate the border of the front with stripes, dots, or simple patterns.
- Draw a picture on the 3 in square. If no photo is available, the drawing works completely on its own.
- Lay the frame face down. Place the drawing face down over the window, centered, and tape its edges to the frame.
- Spread a 1/4 in stripe of glue along all four edges of the backing and press the frame onto it.
- An adult reinforces the back of the top border with a small piece of tape, then punches a hole through both layers at the top center, 3/8 in below the edge.
- An adult threads the yarn through and knots the two ends together.
If the corners curl, press the frame flat under a book until the glue is dry. Use only your own child’s drawing or a photo with permission, never copied artwork.
Displaying Your DIY Christmas Ornaments
Finished Christmas crafts need a display that suits paper. Wait until the glue is completely dry before hanging anything, following the glue’s label rather than a set time. Check that thin parts are reinforced with tape on the back and that every hole has tape behind it.
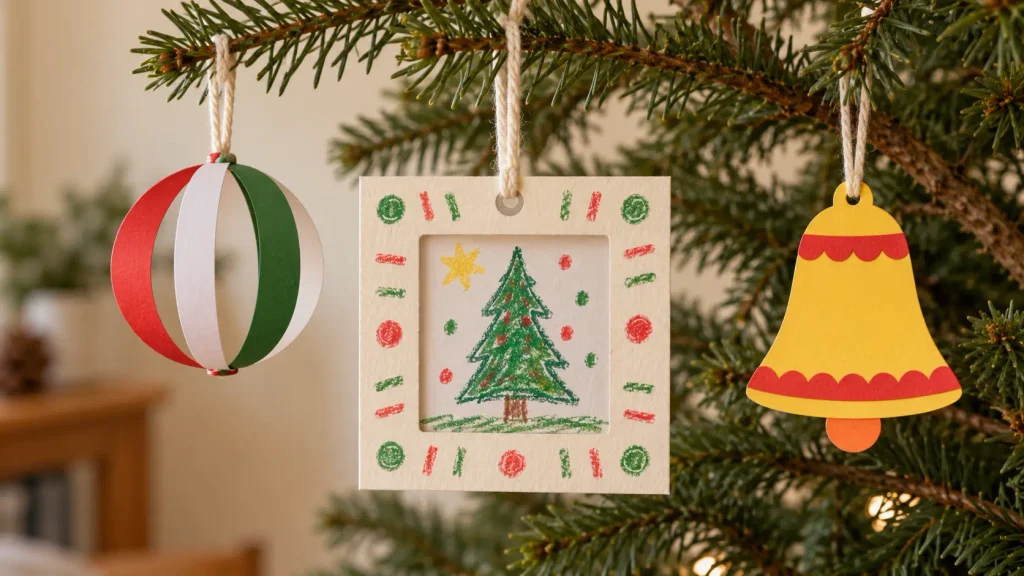
Use short loops made from the 6 in yarn pieces. A loop will be shorter than 3 in (7.5 cm) after the ends are tied; taped tails also shorten the hanging part. An adult should choose where the ornaments hang, away from open flames, heaters, and hot bulbs. An adult can hang DIY Christmas ornaments on a suitable tree branch or a securely fixed classroom display line, out of children’s reach. Write the child’s name in pencil on the back.
For another way to make dimensional paper ornaments, Crayola’s 3D Paper Shape Ornaments joins two shapes with opposing slits. It is a different construction from the strip and folded circle baubles here.
Making Homemade Christmas Ornaments with a Group
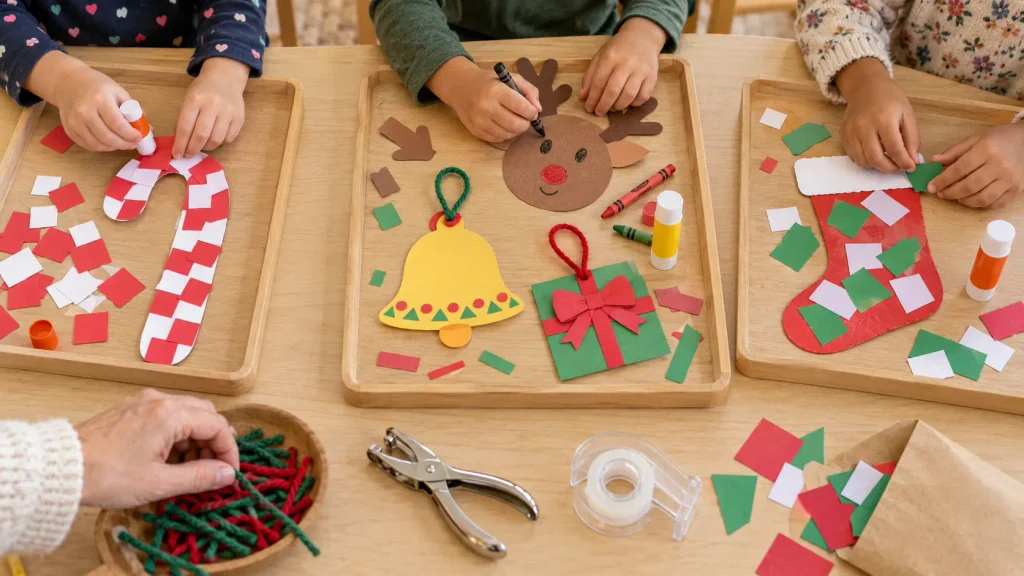
Running these Christmas crafts for a group goes best when the pieces are ready before children arrive. Choose two or three projects for one session rather than all ten, and pack each child’s pieces in a labeled envelope.
Offer a precut option for younger children, where the adult has cut every shape and the children glue and decorate. Offer a more independent cutting option for older children, using lines the adult has drawn and child-appropriate scissors. Show one finished sample so everyone understands the assembly order. For these Christmas crafts, the assembly steps stay the same while children choose colors, patterns, and details. That makes the group’s homemade Christmas ornaments look different even when they follow the same sequence.
For another Christmas paper activity, explore these nativity crafts for kids.
Frequently Asked Questions
Which paper works best for Christmas crafts like these?
Colored copy paper suits torn, folded, and glued pieces. Light cardstock suits backings, rings, frames, and antlers. Very thin paper curls under glue, and heavy cardstock is hard to fold.
Can preschoolers make these Christmas crafts?
Yes, with adult preparation. Preschoolers can tear, glue, draw, and place pieces on precut shapes, which covers the wreath, candy cane, stocking, and bell. Adults should handle the strip bauble taping, the folded circle final join, and every hole and loop. If a child needs gentle cutting practice first, fine motor skills worksheets are a separate paper-based option, but none are needed to make these ornaments.
Can I make these DIY Christmas ornaments without a printer?
Yes. Use a ruler for strips, squares, and triangles, and trace round lids for circles. An adult can sketch the candy cane, stocking, bell, and reindeer pieces freehand within the listed dimensions before cutting them out. These outlines do not need to be perfectly symmetrical, and no downloadable template is required for these Christmas crafts.
How can I stop the hanging hole from tearing?
Press tape on the back before punching. Keep the hole at least 3/8 in from any edge, punch through two layers where the project allows, and use a short loop.
How should I store homemade Christmas ornaments?
Let the glue dry completely first. Then layer the flat ornaments with paper between them in a box, and give the dimensional baubles room so they are not crushed. Keep the box dry.
Choose One Christmas Craft to Make First
Pick one project and gather its pieces. For a first session, choose the torn paper wreath or the paper mosaic candy cane once an adult has prepared the base shapes. Once your group is comfortable, try the strip bauble or folded circle bauble, then add the frame as a keepsake.
Choosing among these Christmas crafts is easier when you prepare the pieces first and leave the color choices to the children. The finished DIY Christmas ornaments are ready to hang on a short loop once the glue is dry.