Learn how to catch a turkey in a pretend tabletop challenge made from paper, cardboard, and tape. Children make a standing paper turkey, draw a plan, build a small catcher with a hand-operated door, and test what happens when the model moves inside.
The seven activities share one turkey and one catcher. They suit children around ages 4 to 7 with adult preparation, and each activity offers a simpler way to participate. No purchased printable or template is required.
This how to catch a turkey activity is an original craft and engineering project. The turkey is a paper figure, and a hand opens and closes the door throughout the activity.
What These How to Catch a Turkey Activities Include
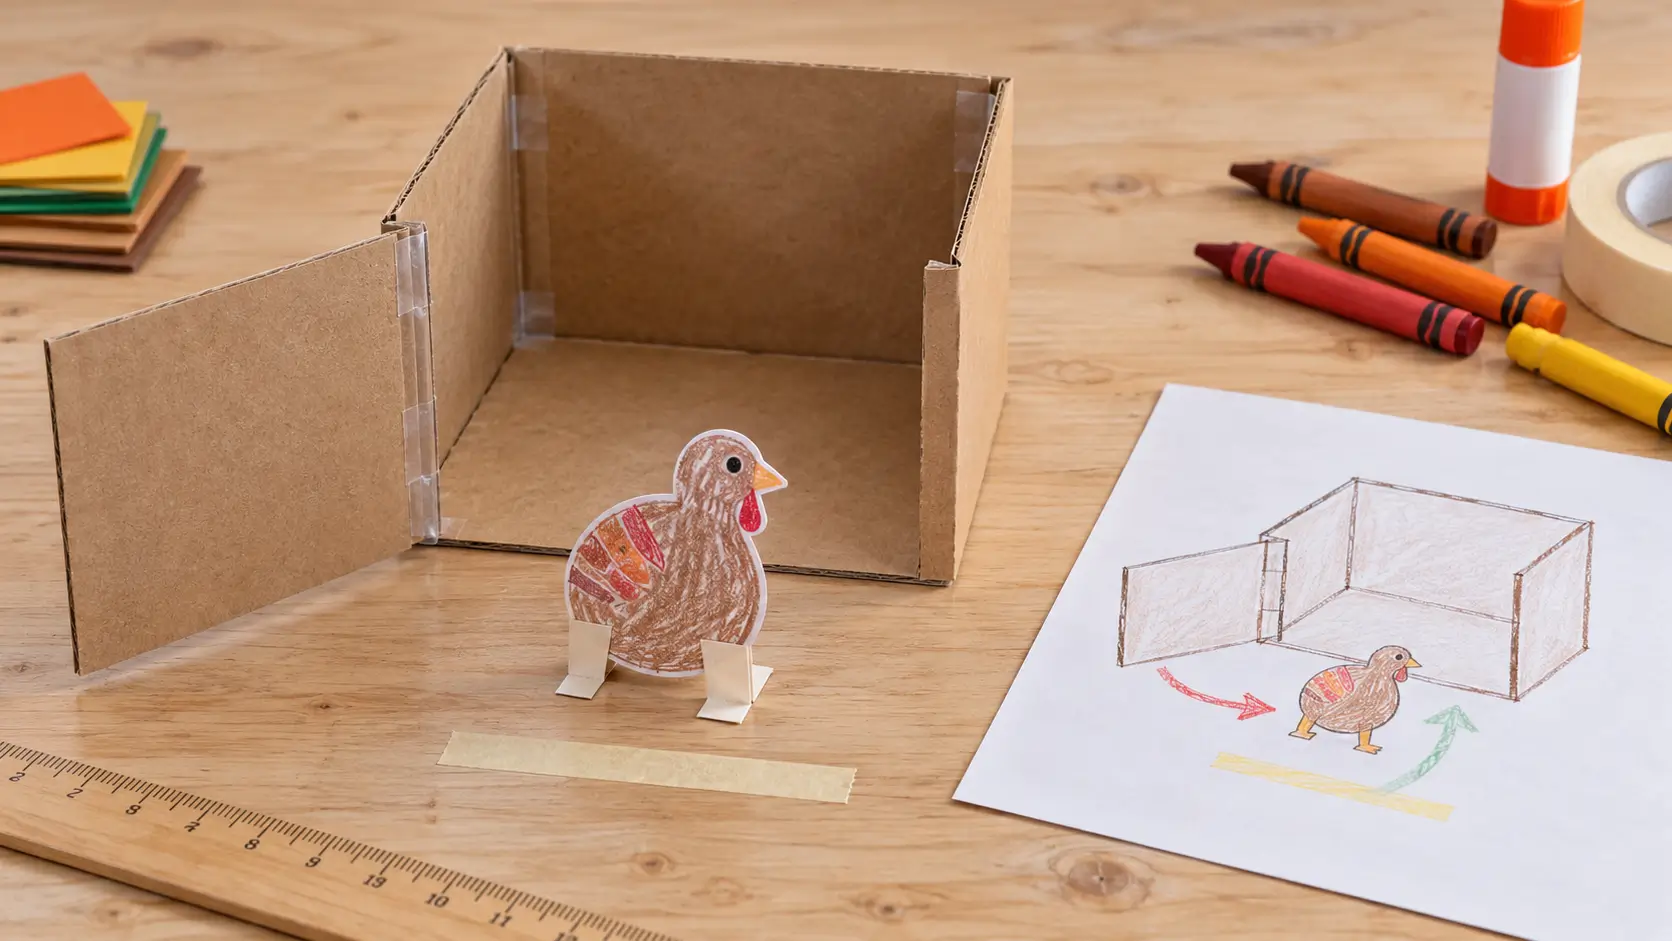
The challenge is simple: move the paper turkey into the cardboard enclosure, close its door by hand, then reopen it without tipping or crushing the model.
The finished turkey is approximately 2 inches tall and 1.5 inches wide. Two small folded supports create a base about 1 inch deep, with one foot extending forward and the other backward. The catcher has a 3-inch-wide opening and walls about 3 inches tall.
Treat these turkey STEM activities as an opportunity to plan, make, observe, and revise. Children can compare their drawing with the finished object and explain what they changed.
| Activity | What children do |
|---|---|
| 1. Make a Standing Paper Turkey | Decorate a figure and help attach its supports |
| 2. Draw a Plan for a Paper Turkey Trap | Sketch an entrance, a door, and a route |
| 3. Build a Simple Cardboard Catcher | Fold walls, tape corners, and attach a hinge |
| 4. Test, Observe, and Improve | Repeat a test and change one feature |
| 5. Measure the Doorway and Count the Trials | Compare heights and record observations |
| 6. Write How Your Model Works | Describe the actions in order |
| 7. Explain, Demonstrate, and Invent | Show the model and tell an original story |
You can spread these Thanksgiving activities across several sessions. Make the paper turkey first, build the enclosure another day, and return to testing when the glue is dry.
Materials and Adult Preparation
All seven how to catch a turkey activities use the same basic materials:
- One 3 by 5 inch index card, plus spare card for adjustments
- Lightweight cardboard from a clean cereal or cracker box
- One cardboard piece at least 9 by 6 inches
- A second cardboard piece at least 4 by 3.5 inches
- Clear tape or masking tape
- A glue stick or white school glue
- A ruler, pencil, and adult scissors
- An empty ballpoint pen for adult creasing
- Crayons or washable markers
- Plain paper, including eight 1-inch paper squares
- A small box to support an upright planning sheet
Measure the packaging before cutting, because box sizes vary. Thin card is easier to crease than thick corrugated cardboard.
An adult measures, cuts, and creases the card. Children can decorate, position pieces, tape with help, operate the door, and describe their observations. Keep adult scissors at the preparation area.
7 How to Catch a Turkey Activities for Kids
Follow the activities in order. Each one uses the figure and enclosure prepared in the previous steps.
1. Make a Standing Paper Turkey
Start the how to catch a turkey challenge with a figure that can stand on the table. Two opposing feet support it on both sides.
Supplies: Index card, ruler, pencil, adult scissors, glue, and crayons.
Finished size: Approximately 2 inches tall, 1.5 inches wide, and 1 inch deep at the base.
Steps
- Adult: Draw a simple turkey silhouette within a rectangle 1.5 inches wide and 2 inches tall. Use a rounded body with a straight lower edge. Draw the eye, beak, and feathers rather than cutting tiny separate pieces.
- Adult: Cut out the figure and two separate card squares, each 1.5 by 1.5 inches. These three pieces fit on a 3 by 5 inch index card if you mark their positions before cutting.
- Adult: On each support square, mark a fold line 0.5 inch from one edge. Crease and fold it into an L shape. Each support now has a 1-inch-tall upright panel and a 0.5-inch-deep foot, both 1.5 inches wide.
- Glue one upright panel against the lower front of the turkey and the other against its lower back. Align both fold lines with the turkey’s bottom edge. One foot should extend forward and the other backward.
- Let the glue dry, then check that both feet rest flat on the table. Children can decorate the visible figure and support panels with crayons or markers.
The two feet create a base about 1 inch from front to back. Check the actual model before continuing, and adjust any curled foot so it rests flat.
Easier option: An adult makes the figure and supports, while the child chooses colors and draws details.
2. Draw a Plan for a Paper Turkey Trap
Before deciding how to catch a turkey with the model, sketch where it will go and how the door will move.
Supplies: Standing paper turkey, plain paper, crayons, pencil, ruler, and a small supporting box.
Steps
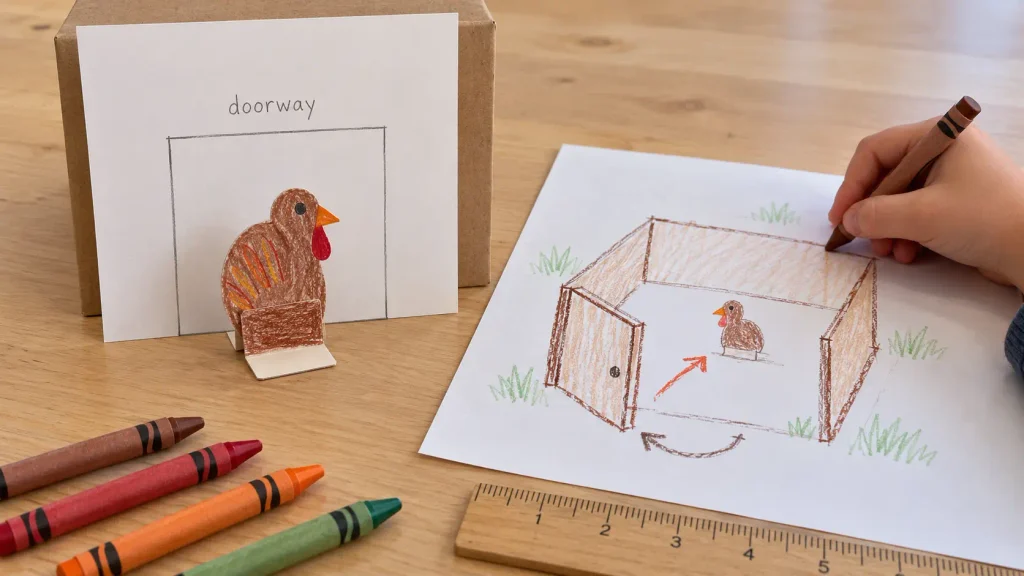
- Ask the child to draw an enclosure, an entrance, and a door. Add an arrow showing where the turkey will move and a curved arrow showing the door’s swing.
- Explain that this sketch is a plan, not a full-size pattern. It does not have to match the turkey’s actual size.
- On a separate sheet, an adult draws a square exactly 3 by 3 inches and labels it “doorway.”
- Stand this sheet against the small box with the square’s lower edge level with the table. Place the turkey in front of it. Compare the figure’s height and width with the square.
A 2-inch-tall turkey should have about 1 inch of space above its head. A figure 1.5 inches wide should leave approximately 0.75 inch on each side when centered.
Use the measured square for the size check. Children do not need to enlarge their freehand sketch to make the real turkey fit it.
Easier option: Arrange paper scraps to represent the enclosure, door, and path, then let the child explain the plan aloud.
3. Build a Simple Cardboard Catcher
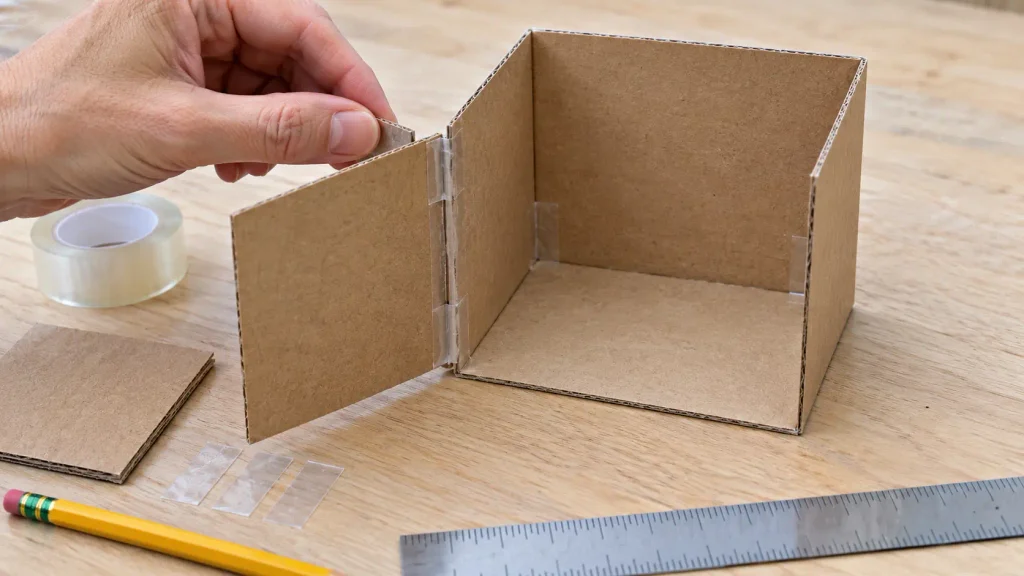
This part of the how to catch a turkey project creates a shallow, roofless enclosure. It has a floor, three walls, and a door hinged at the left front corner.
Supplies: Both cardboard pieces, ruler, pencil, creasing pen, adult scissors, tape, and the paper turkey.
Key measurements
| Part | Size |
|---|---|
| Floor | 3 inches wide by 2.5 inches deep |
| Back wall | 3 by 3 inches |
| Each side wall | 3 inches tall by 2.5 inches deep |
| Front entry | 3 inches wide, with walls 3 inches high |
| Door | 3.5 inches wide by 3 inches tall |
Steps
- Adult: Draw a horizontal bar 9 inches wide and 2.5 inches tall on the larger cardboard piece. Divide it into three equal sections, each 3 inches wide. The middle section will be the floor.
- Adult: Above the middle section, draw a 3 by 3 inch square sharing its bottom edge with the bar. This is the back wall. Cut out the complete shape, which resembles an upside-down T. It measures 9 inches across and 5.5 inches from top to bottom.
- Adult: Crease the two lines dividing the bar and the line joining the back wall to the floor. From the second piece, cut the 3.5 by 3 inch door.
- Fold the two end sections and the back square upward. The three walls should stand about 3 inches high. Tape the two rear corners, placing half of each tape strip on each adjoining wall.
- Face the open front. Hold the door across it with its left edge beside the left wall’s front edge and its bottom level with the floor. Its extra 0.5 inch extends beyond the right wall as a handle. Tape the door to the outside of the left front corner to form a flexible vertical hinge.
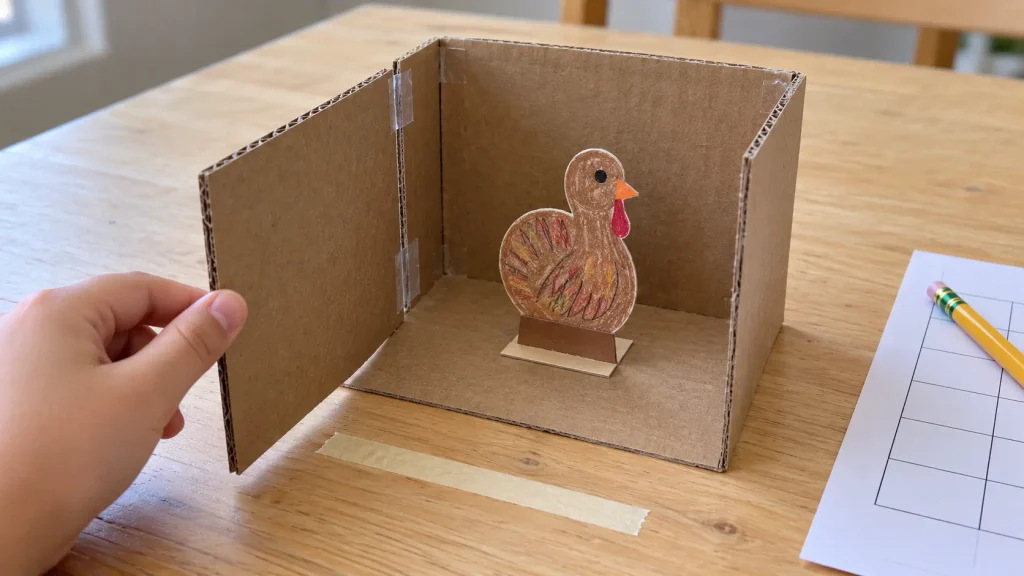
- Swing the door outward. It should open away from the floor and then return across the entrance. Support the turkey by its folded base and place it in the center of the enclosure. Close the door gently and check that it does not touch the figure or its feet.
The 1-inch-deep base should leave about 0.75 inch in front and behind when centered on a 2.5-inch-deep floor. Small cutting differences are normal, so check the actual clearances.
Easier option: An adult folds and tapes the enclosure beforehand. The child adds the door tape with help and checks the fit.
4. Test, Observe, and Improve
Testing shows whether your plan for how to catch a turkey works as a small model. Use the same starting position each time.
Supplies: Completed model, masking tape, pencil, and the chart in activity 5.
Steps
- Put the catcher on a flat table. Mark a starting line about 4 inches in front of the entrance with masking tape. Open the door fully and place the paper turkey on the line.
- Support the turkey by its folded base, carry it through the entrance, and set it in the middle of the floor. Let go.
- Move the door across the front by hand and hold it closed for a slow count of three.
- Check whether the turkey remains upright and whether the door clears the figure. Reopen the door and watch for scraping or catching.
- Record what happened, reset the model, and repeat until you have completed three trials.
Choose one problem you actually observed. Reinforce a leaning wall, refold a curled foot, or adjust a stiff tape hinge. Change only one feature, then repeat the three trials.
If everything works, keep the original result or choose a clear new question, such as whether the turkey can stand in a different position. A change is not required just to fill the chart.
For further ideas on planning, testing, and revising, see NAEYC’s family guide to tinkering, making, and engineering.
Easier option: The child points to “yes” or “no” while an adult records the answer. Leave the comments blank until someone has observed the test.
5. Measure the Doorway and Count the Trials
These turkey STEM activities also offer a way to compare the figure with the space around it.
Supplies: Eight 1-inch paper squares, small tape loops, ruler, pencil, and the same model.
Steps
- Place one paper square against the inside back wall, with its bottom edge resting on the floor. Attach it with a small tape loop.
- Add two more squares directly above it, edge to edge without gaps or overlap. Three 1-inch squares should reach the top of a 3-inch wall.
- Place the turkey in front of the column. Its head should reach approximately the top of the second square.
- Compare the heights. The back wall represents the intended doorway height because both are 3 inches tall. An adult can also hold a ruler beside the front entrance to check the measurement directly.
- Remove the squares before further trials, then count the recorded “yes” answers in each chart column.
You should find about 1 inch of clearance above a 2-inch figure, but record the actual measurement rather than changing the answer to match the guide.
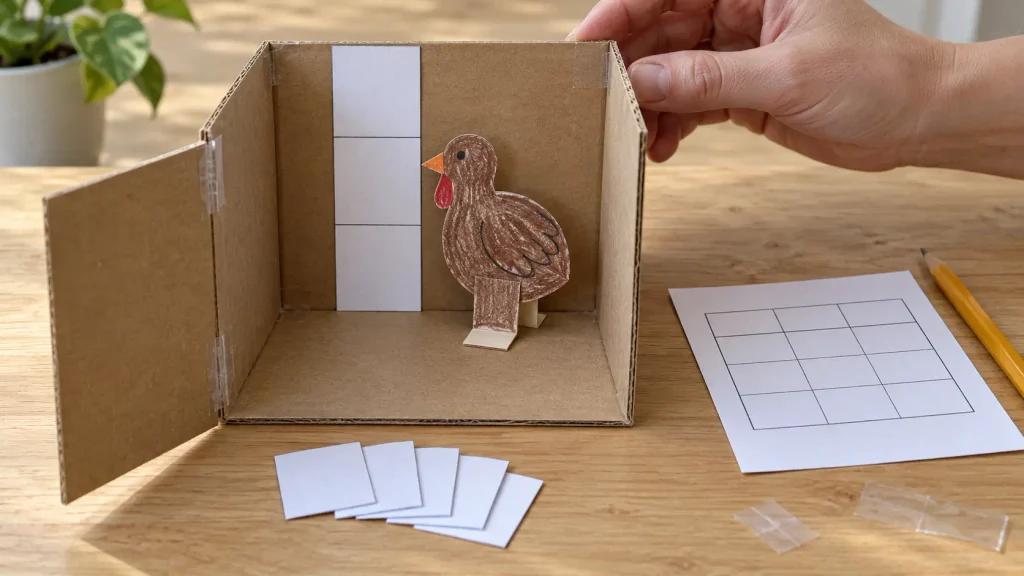
Copy this table onto paper. Use one copy before a revision and another afterward.
| Trial | Entered without bumping | Door closed across front | Turkey stayed upright | Door reopened freely | What we noticed |
|---|---|---|---|---|---|
| 1 | |||||
| 2 | |||||
| 3 |
Easier option: Compare the paper squares without using a ruler. Three squares are taller than two; point to the remaining space together.
6. Write How Your Model Works
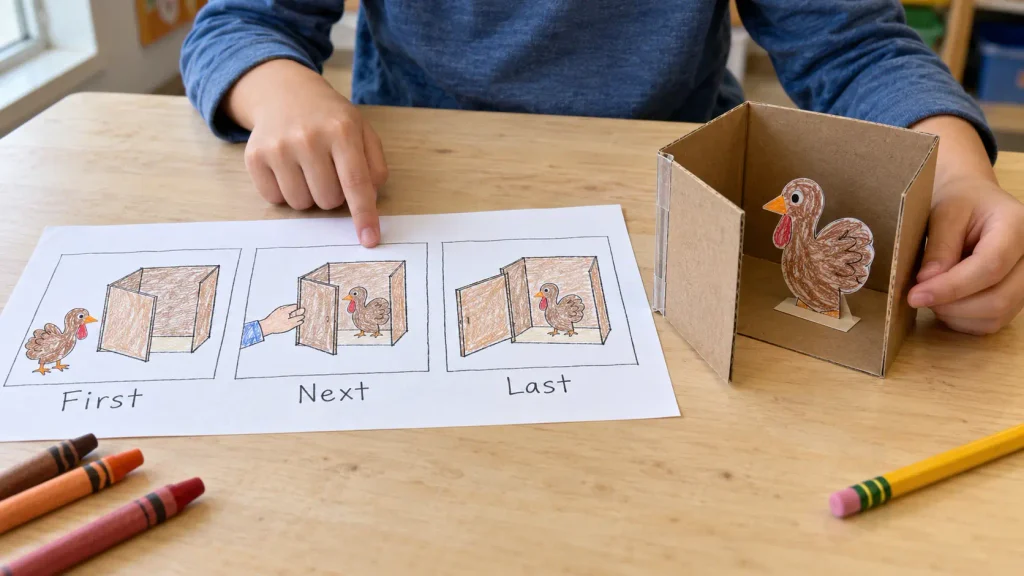
Describe how to catch a turkey with the model using First, Next, Then, and Last.
Supplies: Paper, pencil, enclosure, and paper turkey.
Here is an example that matches the hand-operated door:
First, I swing the door open to the side. Next, I carry my paper turkey inside and place it in the middle of the floor. Then, I close the door with my hand. Last, I open it again and check that my turkey is still standing.
Let the child demonstrate the actions and say, write, or dictate a sentence for each one. Read the instructions while repeating the demonstration. Change any sentence that does not match what the model actually does.
Easier option: Draw three pictures: the open door with the turkey outside, the turkey inside as the door closes, and the door open again. An adult can add the child’s own words beneath the pictures.
7. Explain, Demonstrate, and Invent a Paper Turkey Story
Show a listener how to catch a turkey with the finished model, then explain one observation or change.
Supplies: Model, plan, observation charts, and a listener.
Steps
- Name the parts: floor, walls, entrance, door, hinge, and turkey supports.
- Demonstrate opening the door, moving the turkey inside, closing it by hand, and opening it again.
- Explain one thing you noticed. If you changed the model, compare the observations before and afterward.
- Make up a short story about the paper turkey visiting its temporary cardboard home. Who meets it there? What happens when the door opens?
Children can tell, draw, or act out their original story.
Easier option: Demonstrate to one familiar person or a stuffed toy, with pointing instead of a spoken presentation.
For a separate decorating project, explore these turkey disguise ideas. Keep any decorations on this standing model small enough that it still fits the entrance.
After the tabletop work, a Thanksgiving scavenger hunt offers a separate activity with more movement.
Adapting the Project for Different Learners
Prepare more of the construction. Adults can cut, crease, and assemble the supports and walls so children focus on decorating, moving the model, and testing the door.
Use spoken explanations. A child can describe the plan for how to catch a turkey while an adult writes labels. Pointing or showing an action is another way to explain an idea.
Add independent measuring. Children ready for a ruler can check the figure, base, wall height, and door width before assembly.
Shorten the session. Make the turkey and plan first. Build or test the model later. One observed trial is a useful starting point, even if you do not complete the full comparison that day.
Frequently Asked Questions
Can preschoolers try these how to catch a turkey activities?
Yes, with adult preparation. Offer a ready-made standing figure and enclosure, then let the child choose colors, move the turkey, operate the door, and explain what happened. Adjust the task to the child rather than expecting independent cutting or measuring.
Is a printable needed?
No. The how to catch a turkey project uses the measurements in this guide and a simple hand-drawn figure. The freehand planning sketch does not need to be drawn to scale.
Does the door close automatically?
No. A hand moves it every time. The model explores planning, fit, hinges, and testing rather than an automatic catching mechanism.
What can we use instead of thick cardboard?
Choose lightweight packaging card, a file folder, or poster board. Use clean material that an adult can cut with scissors and crease without tearing.
What if the paper turkey falls over?
Check that both feet extend in opposite directions, both rest flat, and the upright panels are glued firmly to the figure. Let the glue dry before testing. Refold a curled foot or replace a damaged support, then repeat the standing check.
Start with One Plan and One Test
Try how to catch a turkey as a pretend project by making the standing figure, drawing a plan, and building the catcher. Run one test and record what you actually see.
Return to measuring, writing, or storytelling when your group is ready. The same model can connect several Thanksgiving activities without needing a different set of supplies for every session.